-
Learn the Basics
-
- Cards
- Card Icons
- Card Details
- Card Statuses
- Card Users
- Card Activity Stream
- Card Status Roles
- Dates in Cards
- Reminder
- Responsible Person
- Card Blockers
- Global Card Blockers
- Card Issues
- Adding Cards to My Space
- Hinzufügen von Karten zu "MySpace"
- Removing Cards from My Space
- Entfernen von Karten aus "MySpace"
-
- Creating Cards
- Changing Card Statuses
- Following Cards
- Scheduling Cards
- Renaming Cards
- Duplicating Cards
- Quick Actions
- Mass Actions
- Copy & Paste
- Creating Card Statuses
- Changing the Default Card Status
- Changing the Order of Card Statuses
- Deleting Card Statuses
- Moving Cards between Spaces
- Archiving Cards
- Unarchiving Cards
- Deleting Cards
- Creating Card Blockers
- Managing Card Blockers
-
- Documents in KanBo
- Card Documents
- Uploading or Creating Documents in Cards
- Attaching and Detaching Documents in Cards
- Space Documents
- Document References
- Document Sources
- Downloading Documents
- Editing Documents
- Editing Documents in Browser
- Editing Documents in Office Applications
- Renaming Documents
- Deleting Documents
-
Visualize Work
-
- Space Views
- Creating Space Views
- Personal and Shared Space Views
- Card Grouping
- Filtering Cards
- Display Settings
- Work Progress Calculation
- Grouping Description
- Card Grouping Settings
- Changing the Order of Groupings
- Changing the Order of Space Views
- Deleting Space Views
- Following Card Statuses and Custom Fields
-
-
Collaborate
-
Level Up Your Work
-
Work Securely
-
Integrations
-
- Advanced KanBo Actions in Power Automate
- Creating KanBo Space Attached to Subfolder Created by Power Automate
- Creating Document Folders in Document Libraries Created by KanBo with Power Automate
- Exporting Space Views to Excel
- KanBo and Azure Logic Apps Integration
- Power Automate Integration: Triggers and Actions
- Seamless Import from Microsoft Planner to KanBo
- Synchronizing KanBo with Outlook Calendar
- Using KanBo Outlook App
-
Bookmarks
This post is also available in: Deutsch

By adding a bookmark to an activity, users can easily access and reference it later, ensuring that important information and discussions are readily available and organized in the Bookmarks section of their profile.
The bookmark section
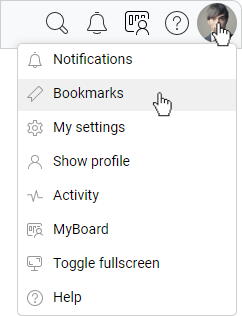
How to enter your bookmark section?
- Click on your icon on the top bar.
- Select
 Bookmarks.
The section with all actions marked with bookmark by you will appear in the pop-up window.

Add a bookmark
- Hover over an action you want to mark with a bookmark.
- Click on the three-dot menu button on the right.
- Select
 Add bookmark.
Your activity will be added to the Bookmarks section in your profile.

A chosen activity will be indicated with a blue icon in the card activities.
Was this article helpful?
Please, contact us if you have any additional questions.
