-
Learn the Basics
-
- Cards
- Card Icons
- Card Details
- Card Statuses
- Card Users
- Card Activity Stream
- Card Status Roles
- Dates in Cards
- Reminder
- Responsible Person
- Card Blockers
- Global Card Blockers
- Card Issues
- Adding Cards to My Space
- Hinzufügen von Karten zu "MySpace"
- Removing Cards from My Space
- Entfernen von Karten aus "MySpace"
-
- Creating Cards
- Changing Card Statuses
- Following Cards
- Scheduling Cards
- Renaming Cards
- Duplicating Cards
- Quick Actions
- Mass Actions
- Copy & Paste
- Creating Card Statuses
- Changing the Default Card Status
- Changing the Order of Card Statuses
- Deleting Card Statuses
- Moving Cards between Spaces
- Archiving Cards
- Unarchiving Cards
- Deleting Cards
- Creating Card Blockers
- Managing Card Blockers
-
- Documents in KanBo
- Card Documents
- Uploading or Creating Documents in Cards
- Attaching and Detaching Documents in Cards
- Space Documents
- Document References
- Document Sources
- Downloading Documents
- Editing Documents
- Editing Documents in Browser
- Editing Documents in Office Applications
- Renaming Documents
- Deleting Documents
-
Visualize Work
-
- Space Views
- Creating Space Views
- Personal and Shared Space Views
- Card Grouping
- Filtering Cards
- Display Settings
- Work Progress Calculation
- Grouping Description
- Card Grouping Settings
- Changing the Order of Groupings
- Changing the Order of Space Views
- Deleting Space Views
- Following Card Statuses and Custom Fields
-
-
Collaborate
-
Level Up Your Work
-
Work Securely
-
Integrations
-
- Advanced KanBo Actions in Power Automate
- Creating KanBo Space Attached to Subfolder Created by Power Automate
- Creating Document Folders in Document Libraries Created by KanBo with Power Automate
- Exporting Space Views to Excel
- KanBo and Azure Logic Apps Integration
- Power Automate Integration: Triggers and Actions
- Seamless Import from Microsoft Planner to KanBo
- Synchronizing KanBo with Outlook Calendar
- Using KanBo Outlook App
-
Labels
This post is also available in: Deutsch
Label is a type of custom field that can describe your card. Use them like tags to organize your work. They inform about the category of cards which can be based on priority, department, or any other criteria that makes sense for your workflow.
You can add many labels to one card. Set different colors of each other for quick recognition.

Labels can be present in three places:
- as a card icon at the space view (above)
- inside the card (card details section)
- as a card grouping option (below)
Add a label to your card
There are three ways to add a label to a card.
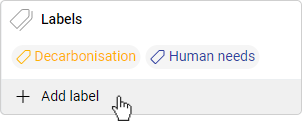
1. Add a label from the card level
- Open the space.
- Enter the card
- Click + Add label and select the one that fits your needs.
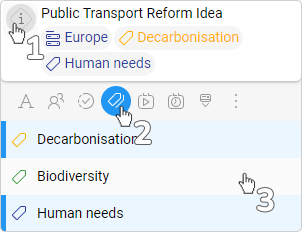
2. Add a label from the space level with Quick Actions
- Open the space.
- Go to Kanban view, List view, or Mind Map view.
- Click on the status icon of a card.
- Select
 Labels.
 - Choose a label you need.

3. Add a label from the space level by moving a card
The last way to add a label is to simply drag a card and drop it on the desired label list.
- Open the space.
- Set the card grouping options to Labels.
- Drag a card and drop it in a different grouping field.
Use Mass Actions to add one label to many cards at once.
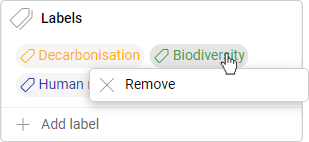
Remove a label from your card
- Open the space.
- Enter the card.
- Click on the label you want to delete and select



You can also use Quick Actions to get it done faster.
Create a new label
Space members can add or remove labels from cards but only space owners can create space labels.
As you may notice before, there is an option to create a label from the card level.
- Open a space.
- Enter a card
- Click on the + Add label button in the Labels field.
- Select + Create.
- Enter a name and click on Create.
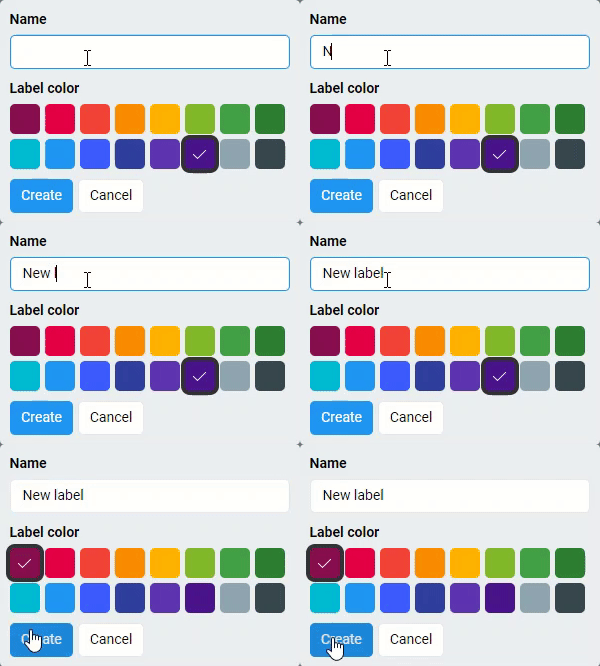

The label you create on a single card will be accessible on the whole space.
Edit or delete a label
Space members can add or remove labels from cards but only space owners can edit and delete space labels.
Go to the Labels menu where you can change their names and colors.
- Open the space.
- Click on the More button (three-dots menu) on the top bar.
- Select


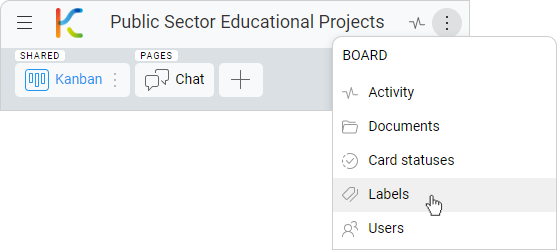

- Now you can click on a label you want to edit.
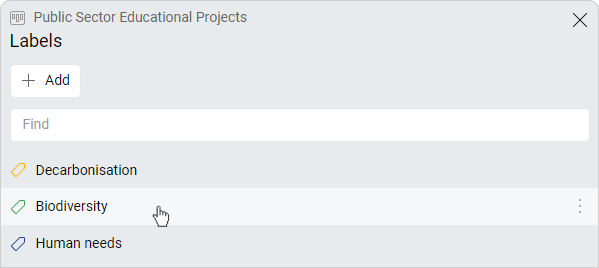

- Here you can change their name and color.
- Click on the three-dots menu button and select Remove to delete a label.
Remember that labels can be shown as card grouping fields. You can edit their names with card grouping settings.
FAQ
Who can create labels?
Only space owners can create labels.
Was this article helpful?
Please, contact us if you have any additional questions.

