-
KanBo Installation
- KanBo Installation Guide (Microsoft 365 + Azure)
- KanBo Installation Guide (On-Premises)
- KanBo On-Premises Installation Requirements and Prerequisites
- Creating an X.509 High-Trust Certificate
- Creating and Updating Elastic Cloud Deployment
- Installing Elasticsearch on Windows
- Installing Elasticsearch on Debian
- Creating a Windows Virtual Machine on Azure for Elasticsearch
- Creating a Linux Based Virtual Machine on Azure for Elasticsearch
- KanBo Modern Web Part Installation
- Supported Browsers
- KanBo Setup
-
KanBo Updates
-
Additional Components
- Installing KanBo Teams App
- Installing KanBo Outlook Add-in
- Installing KanBo Mini Application
- Installing Nintex Integration
- Installing Autodesk BIM Plugin
- Configuring UiPath Integration
- Installing and Configuring Power Automate Integration
- KanBo External User Groups (Active Directory Integration)
- User Auto-Provisioning on First Access (SharePoint Plugin)
- SharePoint Profile Synchronization
- Configuring Sync Targets
- SharePoint Site Collection Balancing and Admin Warnings
- Setting Up BIM Sync WebJob
- Configuring OData Integration for Power BI Desktop
- KanBo PowerShell Commandlets
- Direct Sync of SharePoint Lists with KanBo
- Enabling KanBo Email Notifications (Azure)
- Enabling KanBo Email Notifications (On-Premises)
- Enabling OneDrive Integration in KanBo
- Enabling Sending Card Messages as Emails
- Enabling Sending Emails to KanBo (Microsoft 365 + Azure)
- Enabling Sending Emails to KanBo (On-Premises)
- Prometheus and Grafana configuration for KanBo metrics
- Show all articles ( 3 ) Collapse Articles
-
Tips & Tricks
- Configuring Document Opening Behavior in KanBo
- Disabling Sleeping Tabs in Browsers
- Disabling Public Space Creation in KanBo
- Checking Certificate Expiration Dates (On-Premises)
- KanBo License ID
- Checking KanBo Version
- Changing the Help URL in KanBo
- Renewing Microsoft Graph Certificate
- Disabling Profile Picture Sync in Profile Sync Job
- Creating and Customizing Profile Sync WebJob
- Configuring KanBo for Microsoft Azure GCC High Environment
-
Troubleshooting
Configuring Document Opening Behavior in KanBo
There are several ways to open documents in KanBo. You can access them directly from cards or the Documents section of a space:
- Open in Microsoft 365 desktop apps (Word, Excel, PowerPoint)
Edit the file using installed desktop apps. Changes are saved automatically to your SharePoint library. KanBo confirms updates by showing a new version of the document in the card’s activity stream.
- Open in browser (Office for the web for Word, Excel, PowerPoint)
Edit the file directly in your browser using Word, Excel, or PowerPoint for the web. Changes are saved automatically to your SharePoint library, and KanBo displays the updated version in the card’s activity stream. - Open on your device (read-only)
View the file on your device without editing it online. - Download the file
Save a copy of the document to your device.
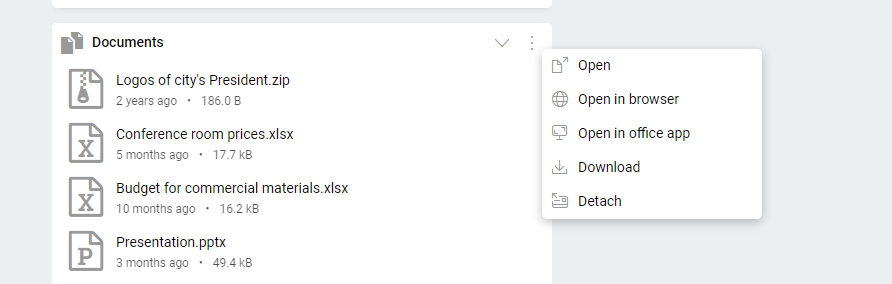
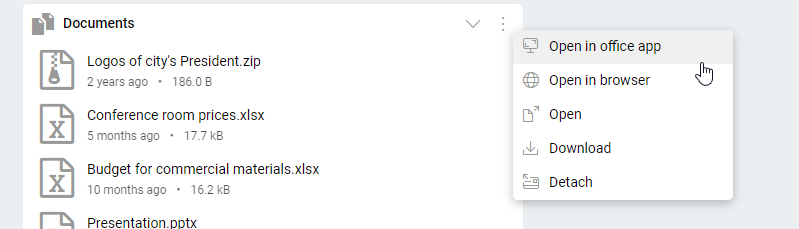
The four document opening options are available in the three-dot menu (More options) next to each file. The order of these options can be configured for the entire KanBo environment. The first option on the list becomes the default way a document opens when you click its name.
Example: Document options available from More (the three-dot menu) in a KanBo card, including four different ways to open a file and additional actions.
This setting applies across the whole organization, ensuring a consistent experience for all users. A KanBo administrator can define and manage this order globally. See the instructions below to learn how to configure it.
Configuring default document opening options
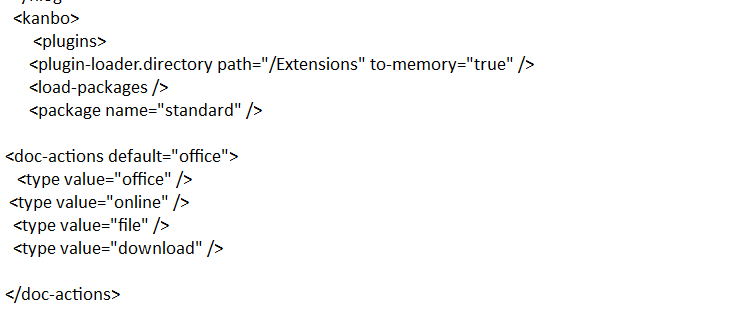
A sample configuration is shown below. With this configuration, documents open in Microsoft 365 desktop apps by default when clicked. In the More options menu, the order is as follows:
- Open in Microsoft 365 desktop apps (“office”)
- Open in browser (“online”)
- Open on your device (“file”)
- Download the file (“download”)
This configuration can be found in the “Plugins” section of KanBo’s appsettings.json.
{
"type": "doc-actions",
"default": "office",
"children": [
{
"type": "type",
"value": "office"
},
{
"type": "type",
"value": "online"
},
{
"type": "type",
"value": "file"
},
{
"type": "type",
"value": "download"
}
]
}, You can change the default value of “doc-actions” to “office,” “online,” “file,” or “download.” In this case, the chosen value will be used when you click on a document.
You can also change the order of the type values in the configuration, which will impact the order of the options when selecting More (the three-dot menu). If you remove one of the type values, it will no longer be visible in the More section’s options.
Was this article helpful?
Please, contact us if you have any additional questions.