
KanBo and Microsoft Power Automate integration: Installation
Prepare and upload the certificate to KanBo
1. Create the certificate pair using this guide.
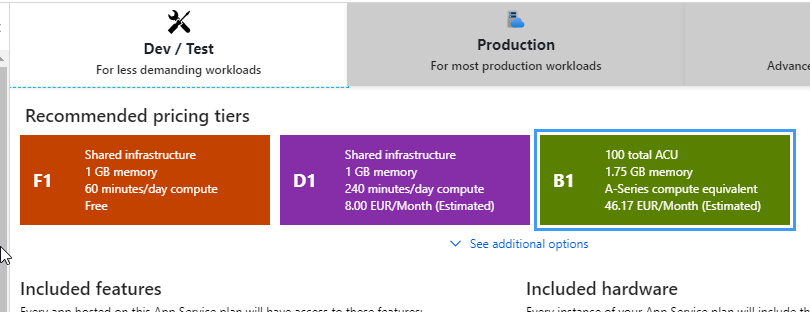
2. Open Azure portal. Make sure your Web App is at least on the Basic plan.
3. Go to TLS/SSL Bindings and go to Private Key Certificates (.pfx) Select Upload certificate.
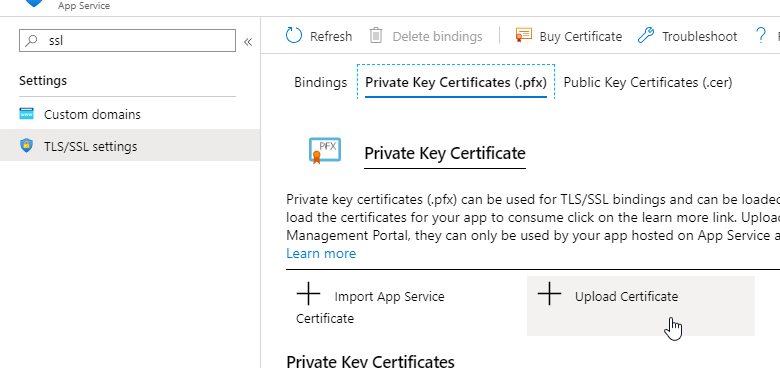
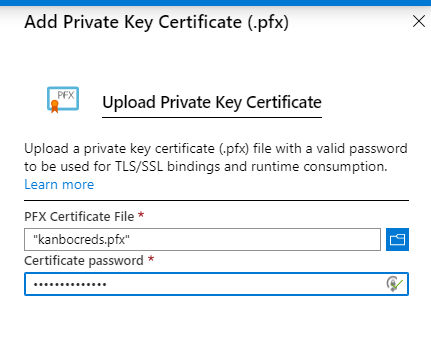
4. Provide the password and Upload it.
 5. Copy the certificate's thumbprint.

6. Open Configuration and add a new Application Setting.
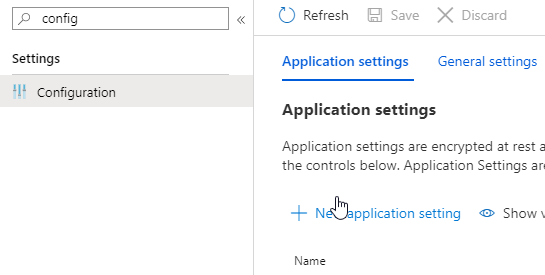
7. The setting's name should be WEBSITE_LOAD_CERTIFICATES. The value should be the Thumbprint of certificate. Save it.
Configuration
1. Open KanBo web.config.
- go to https://your-kanbo-address.scm.azurewebsites.net/DebugConsole/?shell=powershell
- then go to site -> wwwroot -> appsettings.json and start its edition.
2. Add the following lines.{
"type": "auth.oauth",
"issuer": "",
"children": [
[
"cert",
{
"type": "x509-store",
"store-name": "my",
"store-location": "currentuser",
"key": "thumbprint",
"value": "",
"valid-only": false
}
],
{
"type": "client",
"id": "",
"secret": "",
"url": "",
"name": ""
}
]
},
{
"type": "plugin",
"alias": "trigger.worker"
},
"trigger-action.webhook"
3. Paste your information inside sections:
Issuer: "" - add a unique name between quotation marks, like:
Issuer: "PowerAuth"
value: "" - add certificate's thumbprint between quotation marks, like
value: "YPWP4YL7DR2KO14YHPGLLDEQZ993FAMZDP7IYMUL"
Save the appsettings.json.
4. Go back to KanBo directory and open the plugins folder.
Make sure to have the following file there:
- KanBo.Oauth.dll
If the file is missing, please contact KanBo support at support@kanboapp.com.
Getting the credentials
1. Open the following link in your browser.
- Change "your-kanbo-url" in the url to Your KanBo address.
- Change "your-issuer-name" to name of your issuer from appsettings.json.
You should receive an output like this:
{
		  "type": "client",
		  "id": "e2xxxxxxxxxxdf",
		  "secret": "KjxxxxxxxsU=",
		  "url": "https://powerautomate.authkanbo.com/kanbo/return",
		  "name": "powerautomate.authkanbo.com"
		}

Add the following to Targets array:
    {
      "keys": [
        "kanxxxxxxxbo.com"
      ],
      "urls": {
        "authorization": "kanxxxxxxxbo.com/auth/flowsh/code",
        "access": "kanxxxxxxxbo.com/auth/flowsh/token",
        "refresh": "kanxxxxxxxbo.com/auth/flowsh/token"
      },
      "kanboApi": "https://kanxxxxxxxbo.com/JsonApi",
      "id": "e2xxxxxdf",
      "secret": "mOxxxxx0d"
    }</client>
2. Open appsettings.json and replace the entry and paste the client entry like this:.


3. Send the data under "Add the following to Targets array:" to support@kanboapp.com, as this entry needs to be added to our broker. We will let You know when the process is finished.
4. After that is done, you can start with activating KanBo custom connector for Power Automate
This article is related to: