
KanBo Installation on Office 365 and Azure (Manual)

Please follow these steps:
- Choose your Subscription.
- Choose Your Resource Group (we recommend creating a new one named "Kanbo").
- Provide the name URL of your site, in our case, it will be "kanboinstallation". Leave the publish on "Code".
- Choose the closest region.
- Choose Your Windows Plan and resize it to at least B1.
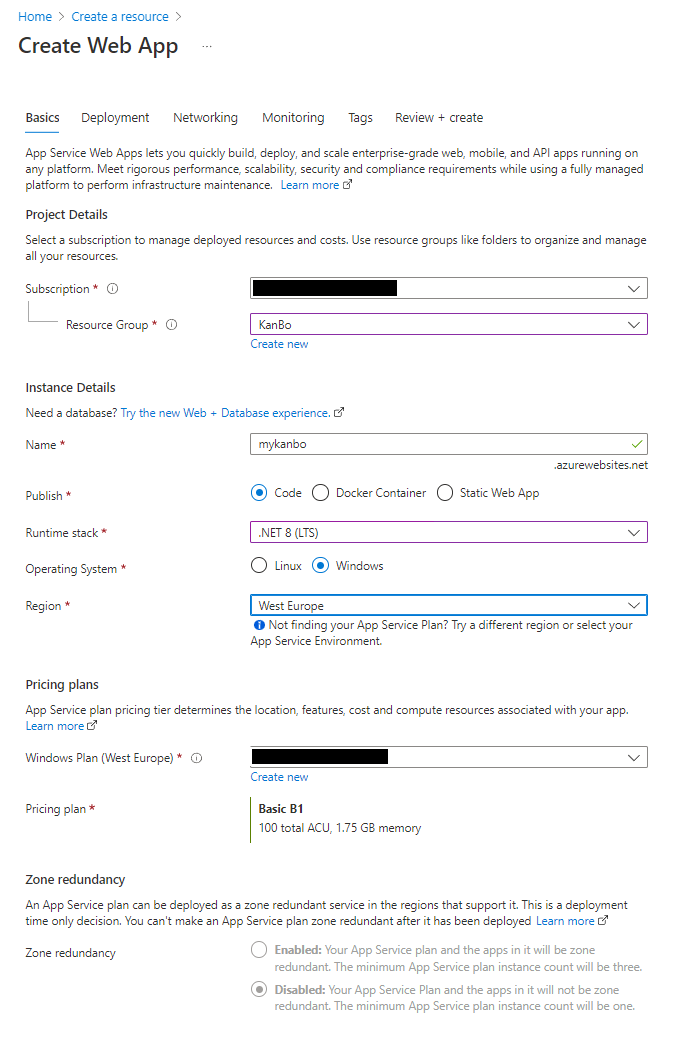
- After that is done, click "Review + create" and create the Web App.
- Repeat the same process when creating the Resource Management App. Make sure You are using the same Resource Group and Pricing Plan
3. Configuring the new Web App
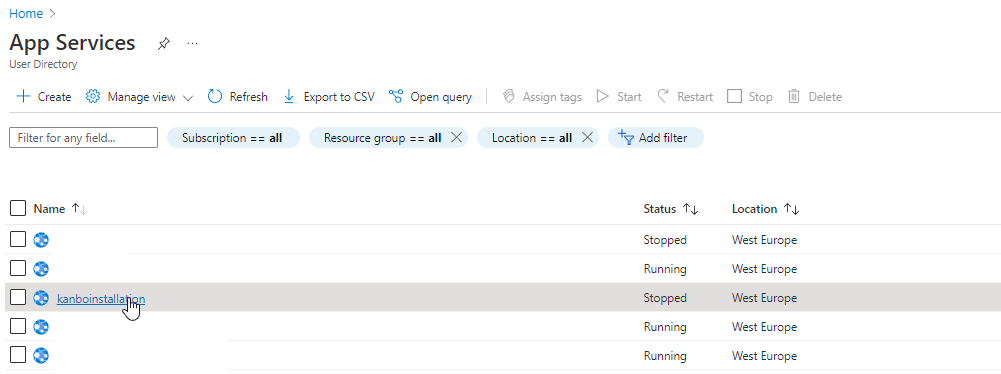
After the page has been created, we need to change some settings.
- Go back to the "App Services" page and search for your application.
- Click on your page to navigate to its options.
- After the page has loaded, scroll the menu down and click on the "Configuration" and then General Settings.
- Make sure the Web Sockets option is on, the platform is set to 64-bit and the .NET version is set to .NET 8. Save your changes.

4. Creating an SQL database
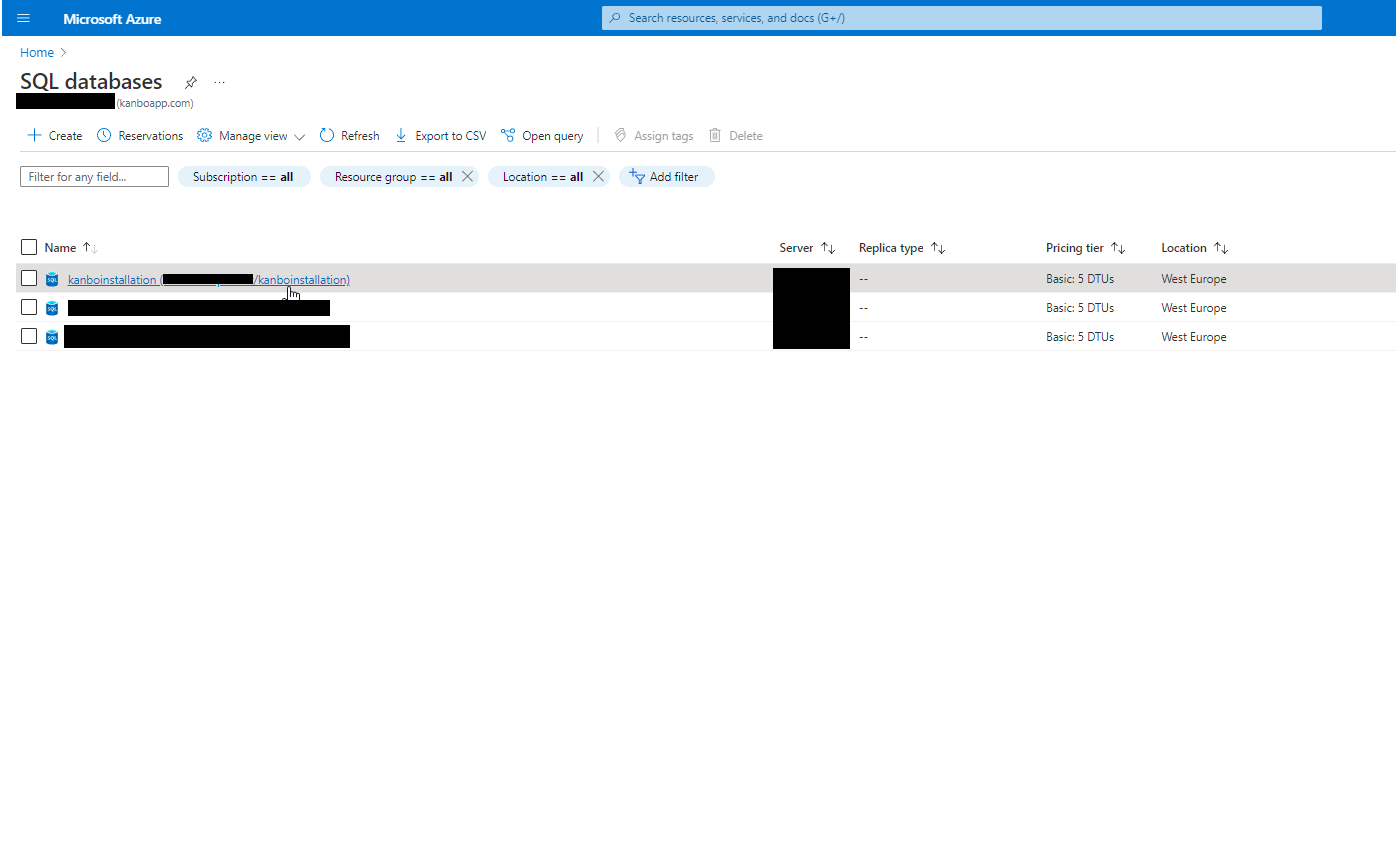
- Enter the link to create an SQL Database.
- Click on Create and follow these steps:
- Choose the same Subscription and Resource Group as Your KanBo Service.
- Choose the name for the database
- Choose the Database server (we recommend creating a new one called "KanBo")
- For compute and storage, choose basic. You can scale it up later (information about optimal sizing can be found
at the end of the article).
5. Configuring the DB connectivity
Use the Azure portal to obtain the connection string necessary for
your Web App to connect with Azure SQL Database.
- Click on SQL Databases icon and then, search for your database.
- Click on your database, the click on "Show database connection strings".
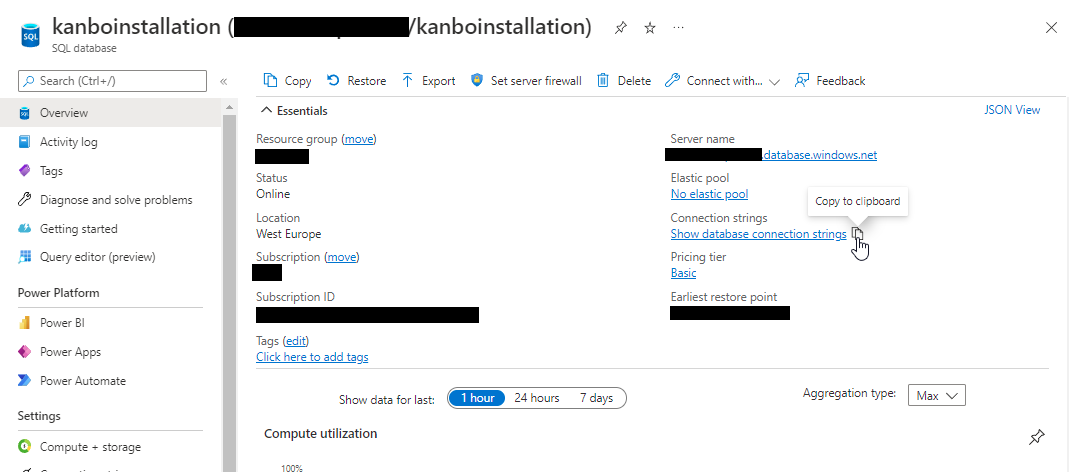
- Copy the ADO.NET connection string and save it somewhere.

Configure Microsoft Graph connectivity
- Go to Azure Active Directory by going to this page.
- Click on Azure Active Directory and look for App Registrations.

- Click on New registration.

- Choose a name for Your App Registration.
- Select the Redirect URI as "Web" and write down a link that looks like this: https://YOUR KANBO ADDRESS/auth/aad/return
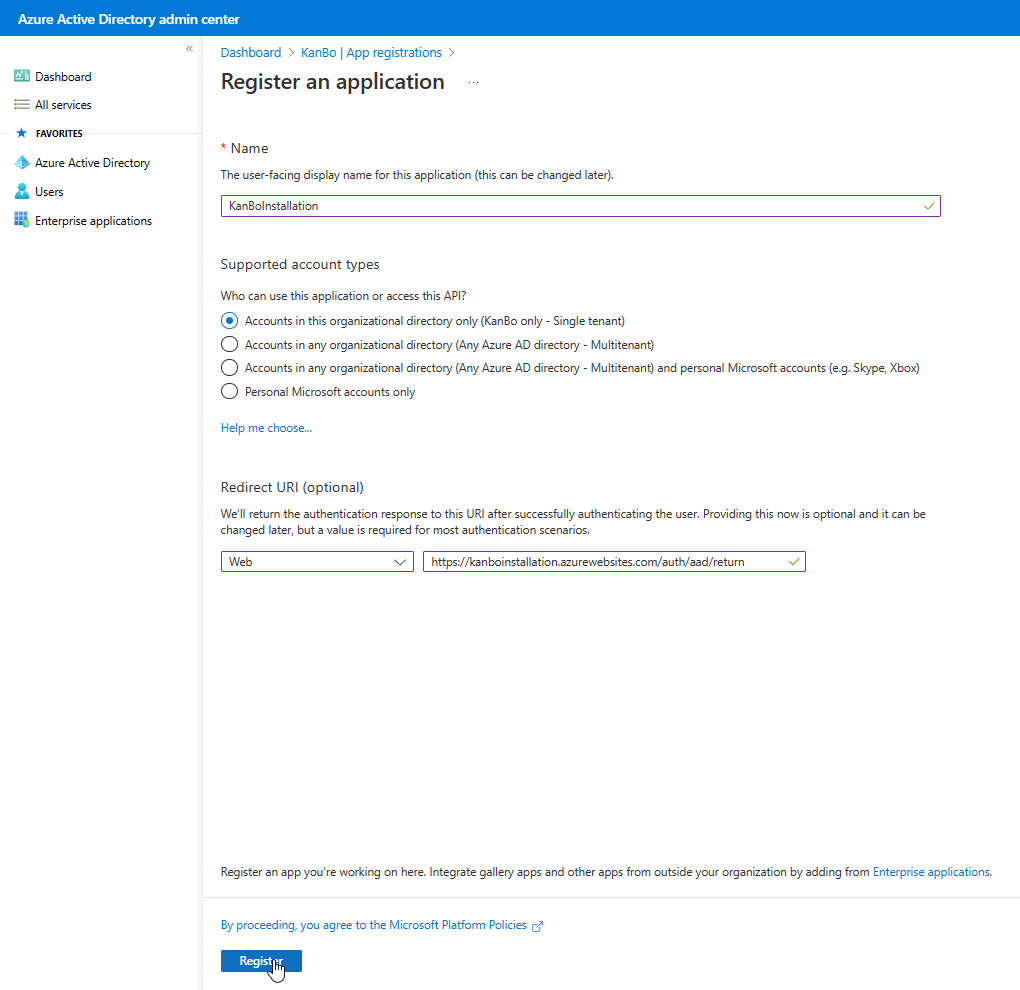
- Click on register to save the changes.
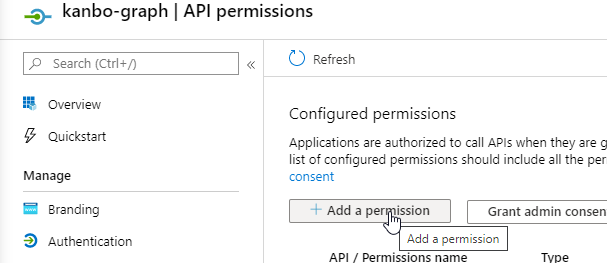
- After the App Registration is finished go to API Permissions.

- Click on "Add a permision" and select Microsoft Graph.
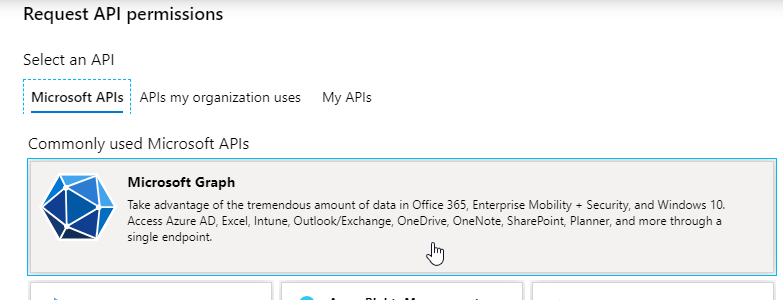
There are two options for permissions, delegated and application. Here's a list of permissions that must be added from both of the options.
Application permissions:
- AppCatalog.Read.All
- AppCatalog.ReadWrite.All
- Calendars.ReadWrite
- ChannelMember,ReadWrite.All
- Directory.Read.All
- Directory.ReadWrite.All
- Files.Read.All
- Files.ReadWrite.All
- Group.Read.All
- Group.ReadWrite.All
- Mail.Read
- Mail.ReadWrite
- Mail.Send
- Sites.Read.All
- Team.ReadBasic.All
- TeamMember.ReadWrite.All
- TeamsActivity.Send
- TeamsAppInstallation.ReadForUser.All
- TeamsAppInstallation.ReadWriteForTeam.All
- TeamsAppInstallation.ReadWriteForUser.All
- TeamSettings.ReadWrite.All
- User.Invite.All
- User.Read.All
Delegated Permissions:
- AppCatalog.ReadWrite.All
- Calendars.Read
- ChannelMember.ReadWrite.All
- Directory.AccessAsUser.All
- Directory.Read.All
- Directory.ReadWrite.All
- Files.Read
- Files.Read.All
- Files.ReadSelected
- Files.ReadWrite
- Files.ReadWrite.All
- Files.ReadWrite.AppFolder
- Files.ReadWrite.Selected
- Group.ReadWrite.All
- Mail.Read
- Mail.ReadWrite
- Sites.Read.All
- Team.ReadBasic.All
- TeamMember.ReadWrite.All
- TeamsActivity.Send
- TeamsAppInstallation.ReadForUser
- TeamsAppInstallation.ReadWriteForUser
- TeamSettings.ReadWrite.All
- User.Read
- User.Read.All
- User.ReadBasic.All
- User.ReadWrite
- User.ReadWrite.All
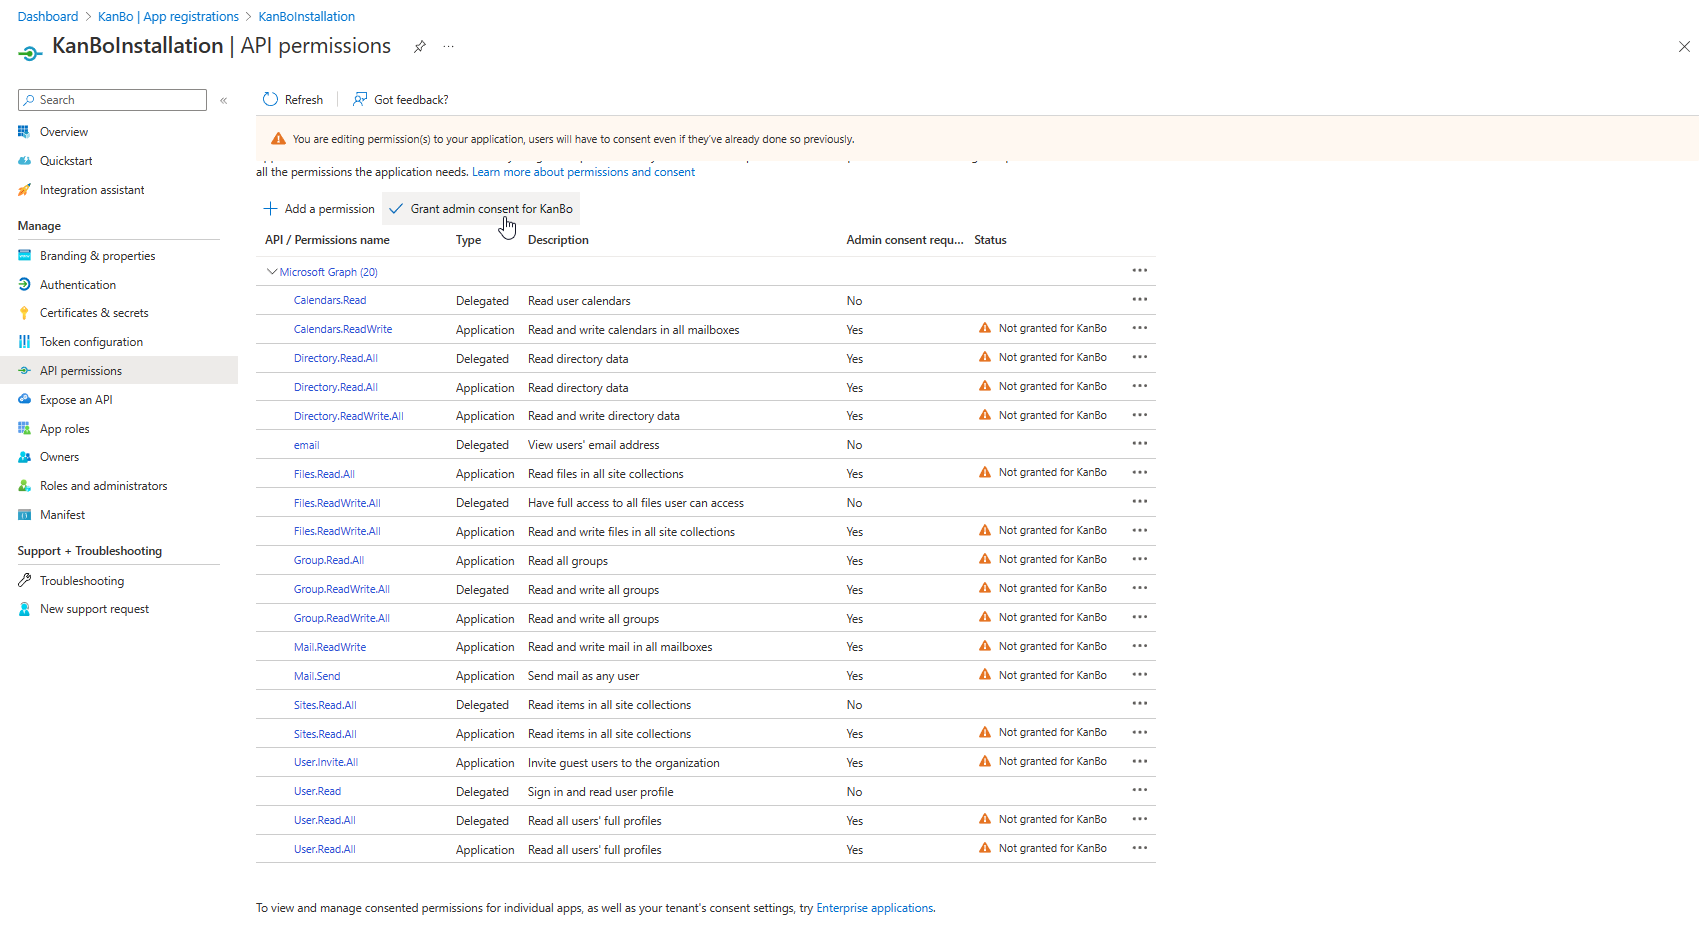
- Now, when all permissions are selected and added, click on "Grand admin consent for KanBo".
- Create a pair of self-signed certificates using this manual.

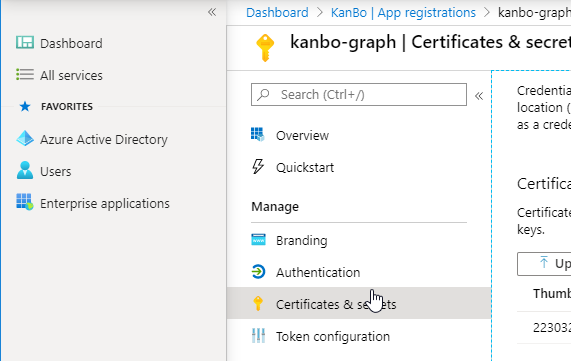
- Go to "Certificates & Secrets" section in App registrations to register a certificate.
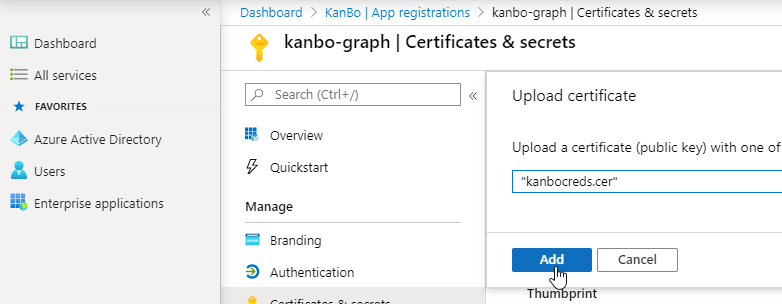
- Click on Upload public key and select your .cer certificate. Now click Save.
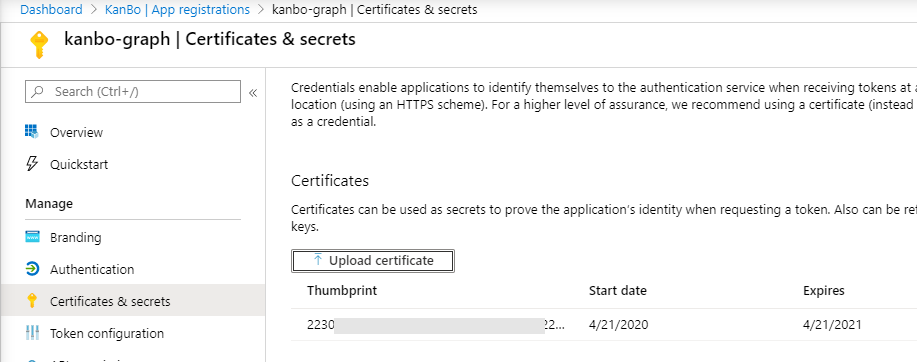
- Your certificate should be now visible.
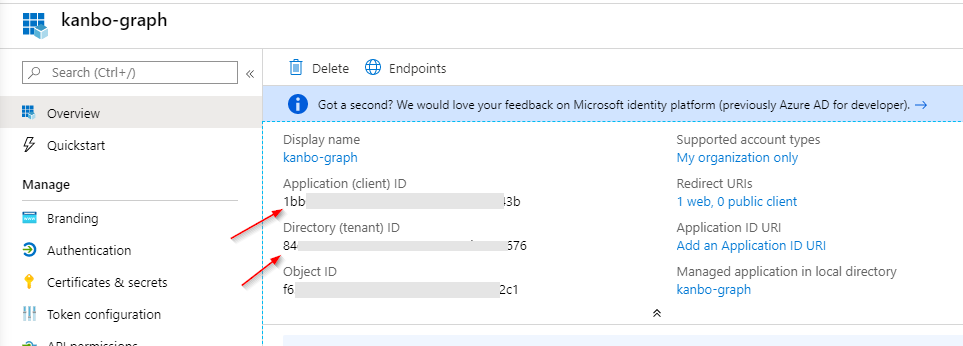
- Go back to Overview. Get Application ID and Directory (Tenant) ID and save it for later as this would be used in the KanBo configuration.
Upload the certificate to KanBo
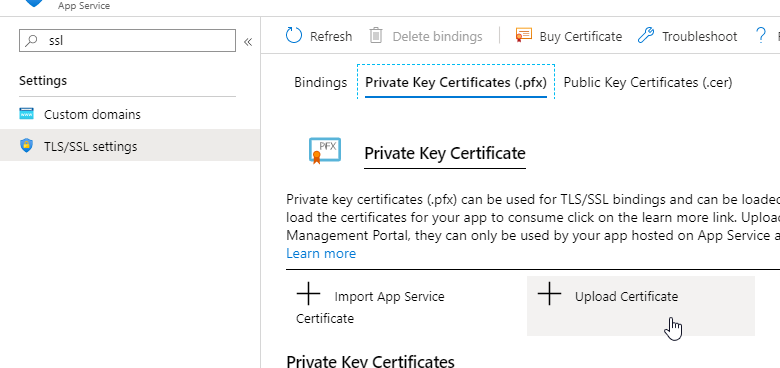
- Go back to Your KanBo Azure Webapp ang go to TLS/SSL settings, then go to Private Key Certificates (.pfx).
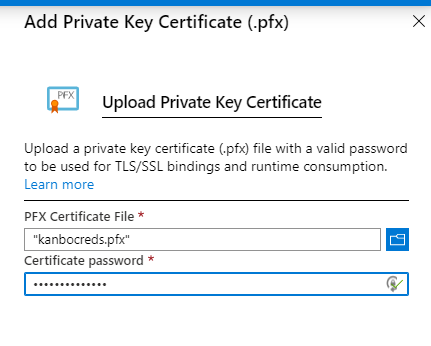
- Click on "Upload certificate".
- Provide the password and Upload it.
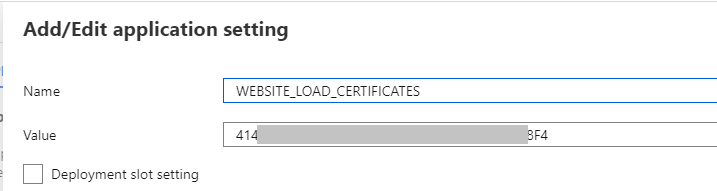
- Copy the certificate's thumbprint.

- Open Configuration and add a new Application Setting.

- The setting's name should be WEBSITE_LOAD_CERTIFICATES. The value should be the Thumbprint of certificate.
- Save it.
- In the Bindings Settings activate "HTTPS only".
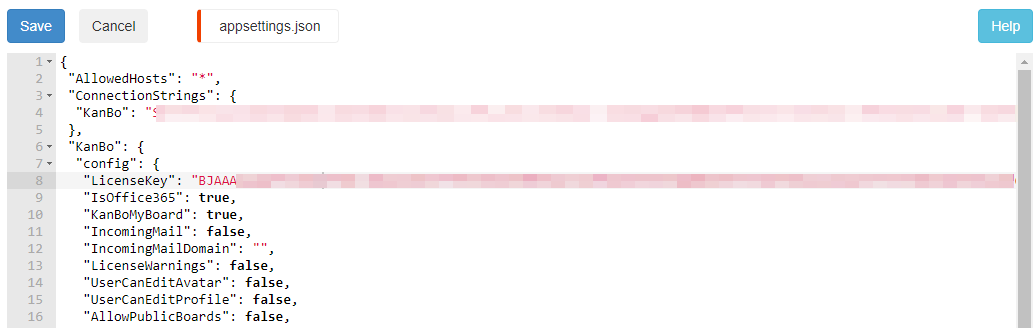
Adjust KanBo configuration
There are some areas that need filling out in the appsettings.json file of both the KanBo App and the Resource Management app. Let's start with KanBo
Paste the previously copied ADO.NET connection string in the place of "FILL-ME", without dropping the quotation marks.
Modify the line by filling in the password and adding "MultipleActiveResultSets=True;" to the end of the connection string.

   {
    "type": "set-language-for-new-users",
    "lang": "de-DE"
   },
Here You are able to set the Default language for the new KanBo Users by changing the "lang" variable. Possible
languages are:- de-DE - German
- de-AT - Austrian German
- en-US - United States English
- en-GB - United Kingdom English
- en-AU - Australian English
- en-CA - Canadian English
- es-ES - Spanish
- pl-PL - Polish
   {
    "type": "server-url",
    "value": "FILL-ME"
   },
The "value" variable should contain the full URL of Your KanBo (e.g. https://mykanbo.azurewebsites.com/)
  {
    "type": "package",
    "name": "auth-aad",
    "client-id": "FILL-ME",
    "tenant": "FILL-ME",
    "thumbprint": "FILL-ME",
    "admin-upn": "FILL-ME"
   },
The "client-id" and "tenant" should contain the Client ID and the Directory (Tenant) ID copied from Your Azure Active Directory App Registration, "thumbprint" should contain the Thumbprint of the certificate You have created, and "admin-upn" should be Your email address in Azure (e.g. admin@company.com).
 {
    "type": "package",
    "name": "webjobs",
    "thumbprint": "FILL-ME"
   },
This is needed to allow KanBo Webjobs to work. Insert the same thumbprint here that You used for the "auth-aad" package.
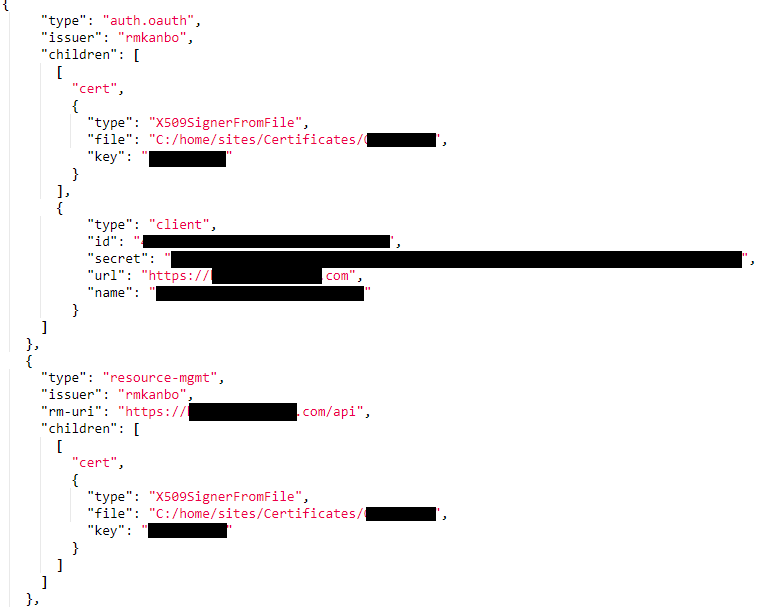
/*RESOURCE MANAGEMENT*/

   {
        "type": "auth.oauth",
        "issuer": "rmkanbo",
        "children": [
          [
            "cert",
            {
              "type": "X509SignerFromFile",
              "file": "C:/home/site/wwwroot/Certificates/CERTNAME",
			  "key": "CERTPASS"
            }
          ]/* client will go here */
        ]
      },
	  {
        "type": "resource-mgmt",
        "issuer": "rmkanbo",
        "rm-uri": "https://RM-APP-URL/api",
        "children": [
          [
            "cert",
            {
              "type": "X509SignerFromFile",
			  "file": "C:/home/site/wwwroot/Certificates/CERTNAME",
			  "key": "CERTPASS"
            }
          ]
        ]
      },
This is where we configure the future connection to Resource Management.
You can now save the appsettings.json file. After that, open the appsettings.json file in the Resource Management package.
{
  "ConnectionStrings": {
    "Database": "CONNECTION-STRING"
  },
Use the same connection string here that You used for the KanBo App
"KanboApi": {
    "Url": "https://KANBO-URL",
    "ClientId": "",
    "ClientSecret": "",
    "CallbackPath": "/oauth/callback",
    "AuthorizationEndpoint": "https://KANBO-URL/auth/rmkanbo/code",
    "TokenEndpoint": "https://KANBO-URL/auth/rmkanbo/token",
    "Scope": "kanbo.id"
  }
}
Uploading the KanBo packages
- Navigate to the Azure website KUDU service for Your KanBo App(add .scm just before azurewebsites.net e.g https://mykanbo.scm.azurewebsites.net) then select Debug console -> PowerShell.
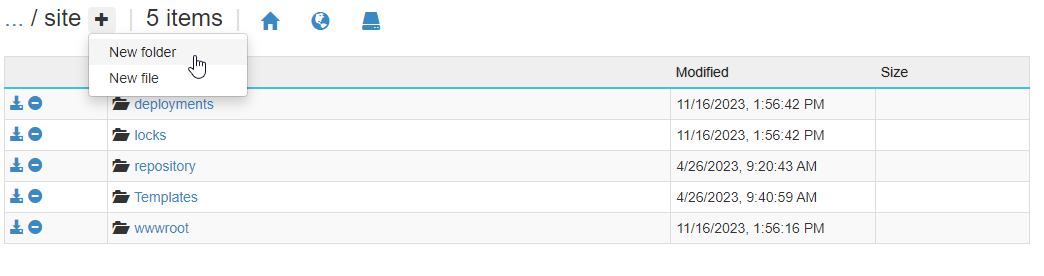
- Enter the folder "site" and create 2 new folders called "Certificates" and "Templates".
 Upload the certificates You created into the "Certificates" folder
 - Pack all your KanBo App files into a .zip file (but please don't add the folder!).
- Now go to the folder called "wwwroot" and drag and drop your .zip archive into right upper part of KUDU service to unzip the contents of the .zip archive.
 Upload the certificates You created into the "Certificates" folder
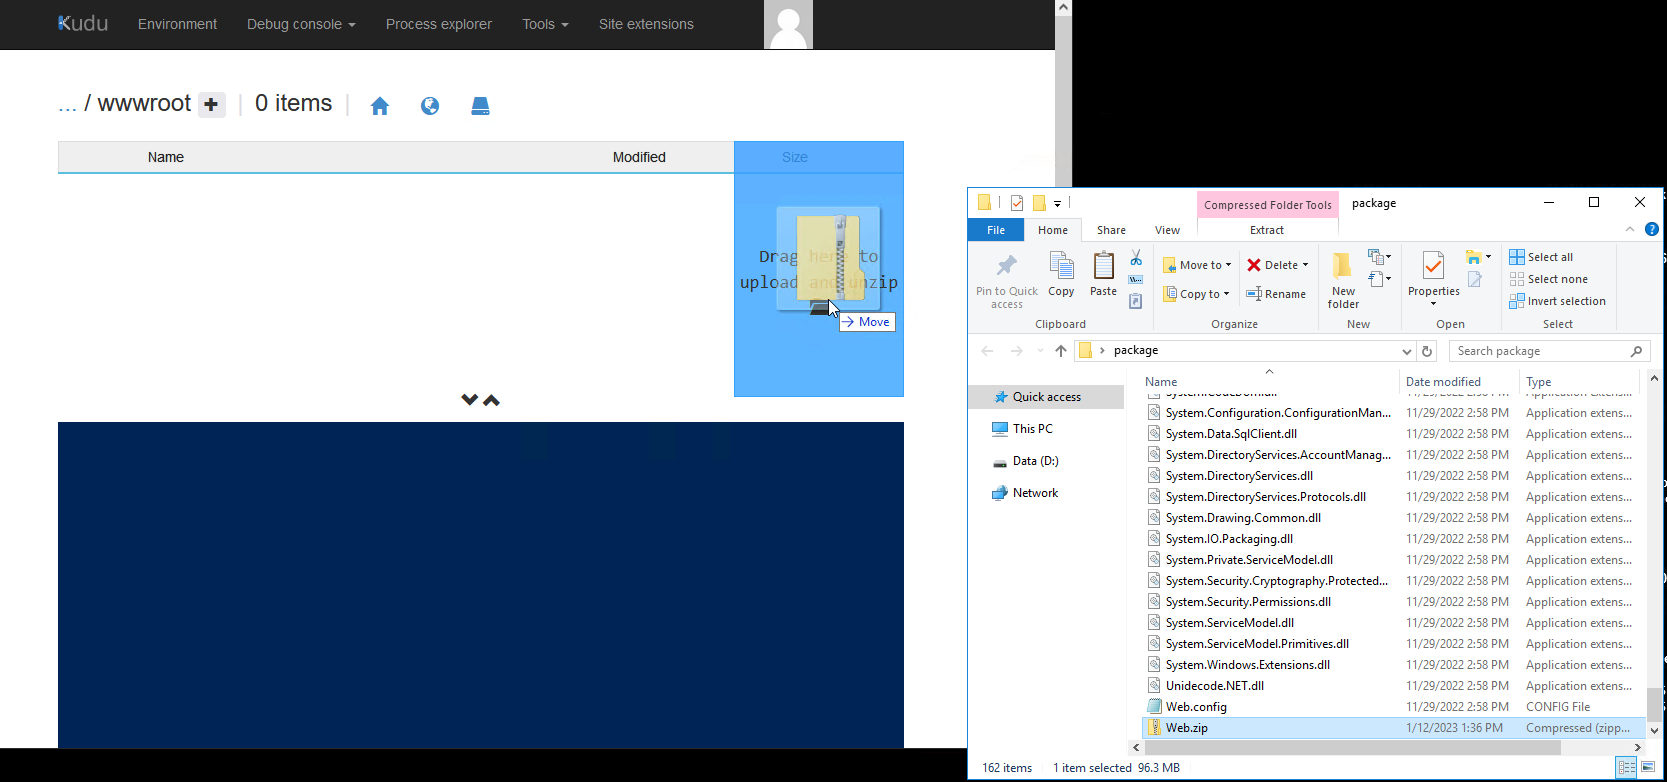
Uploading the Resource Management package
Similiar process to uploading the KanBo files. Pack Your Resource Management package into a .zip file. go to the Kudu tools of the Resource Management app and upload the Resource Management package by drag and dropping it to the right side.Creating the databases
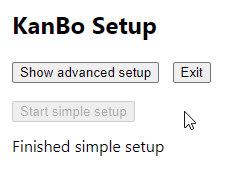
- Go to https:{your kanbo address}/setup and you will be directed to the KanBo Setup page.
- Choose the Start simple setup option.

After clicking on the Automatic Setup option, installation of KanBo Setup will proceed. Wait a couple of minutes
until it is finished.
Obtaining the license key
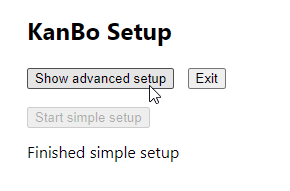
- To obtain a KanBo License ID, click on "Show Advanced Setup", then click on the "Refresh" button near the License ID fieldset.
- Please send the KanBo ID to support@kanboapp.com, so a license key can be generated and sent to you.
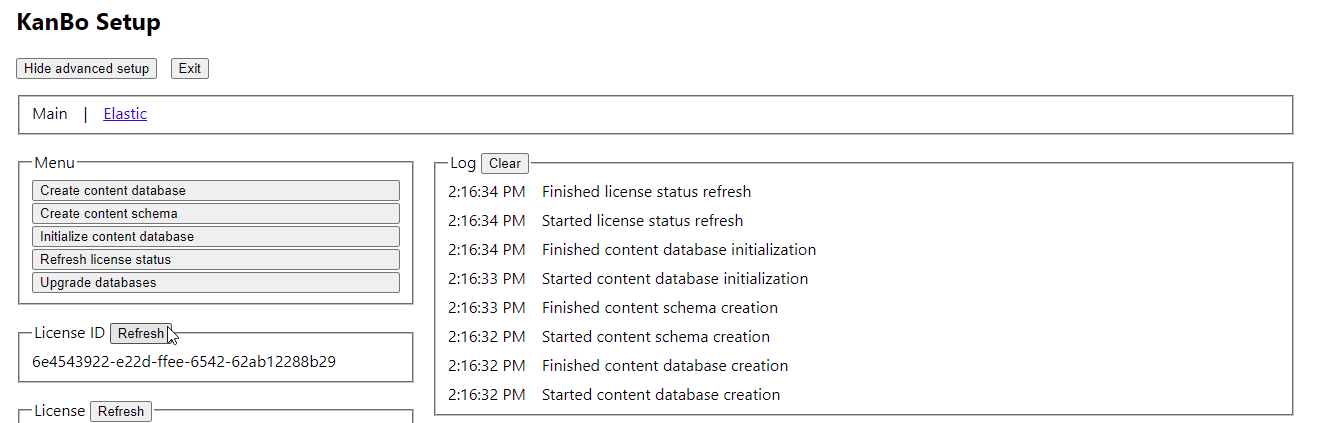
- Go back to the appsettings.json and paste the license key in the "LicenseKey" variable.
- After updating the pasting the LicenseKey, save the appsettings.json file and restart the KanBo app.
Your KanBo has been successfully installed, but there is still some work to be done.
Configuring KanBo and Resource Management connection
First, start off by restarting the KanBo App in Azure
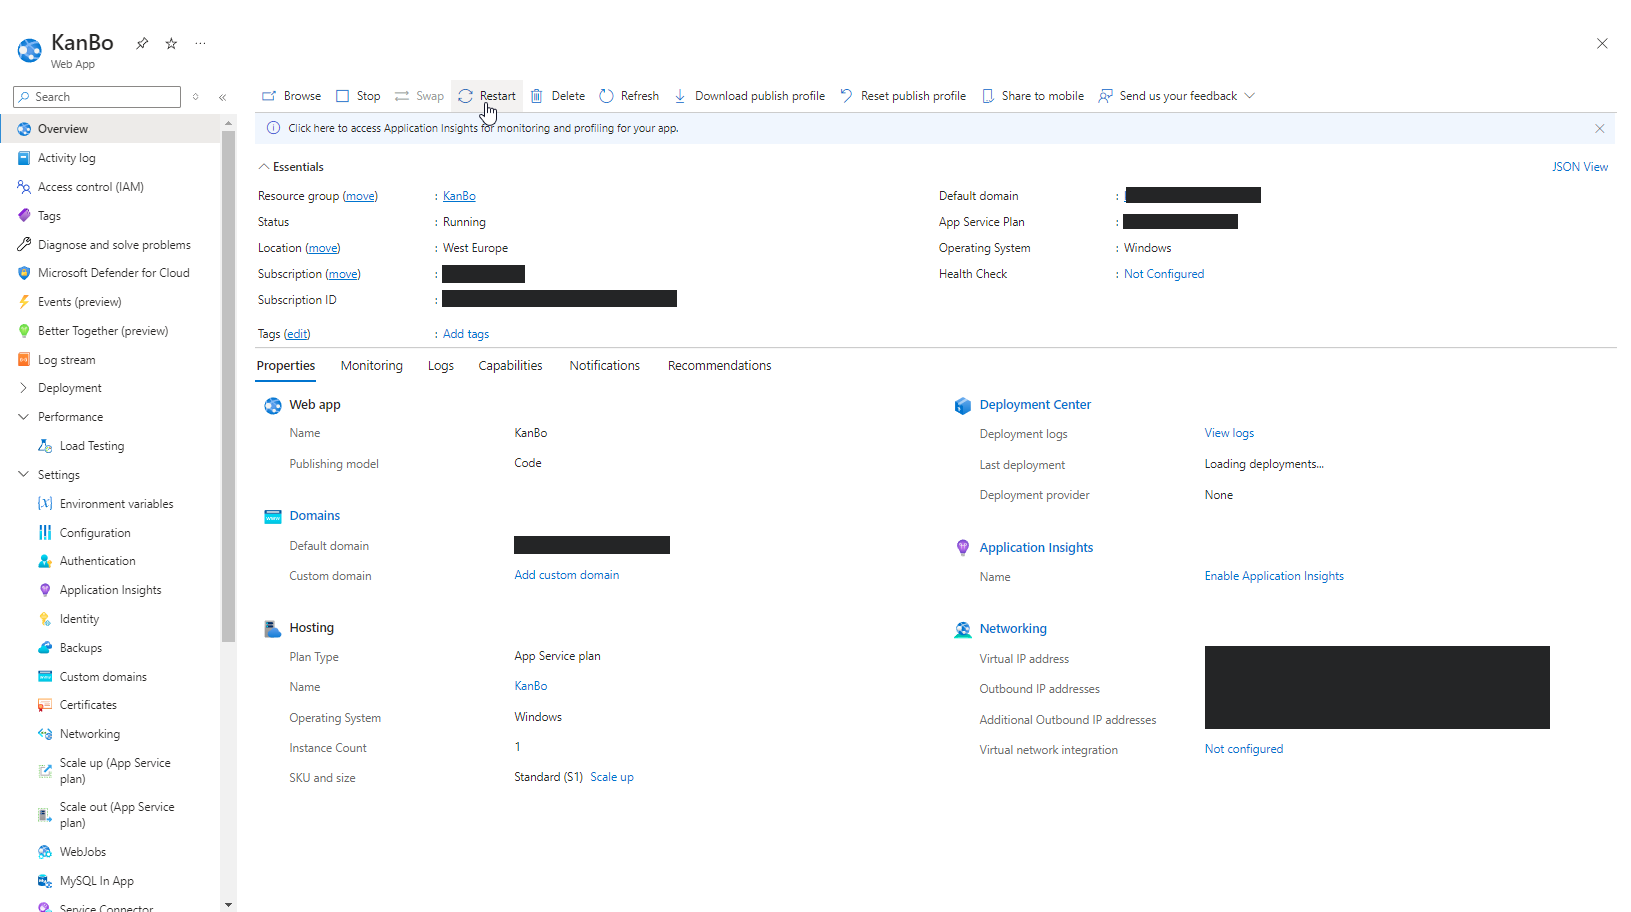
Then, after Your KanBo has restarted, enter an url like this: https://YOURKANBOURL/auth/rmkanbo/newclient
You should be presented with a page that looks like this

There are two parts here. The "Client config" part that goes into the appsettings.json of the KanBo App, and the "OAuth2 config" which goes into the appsettings.json of the Resource Management app.
For the KanBo side, You can find this comment in the appsettings.json:
/* client will go here */
Replace it with a comma, and then paste the Client config.
Couple of things to note, the "client" variable needs to have it's name changed to "id", the "url" value has to have the url of Your Resource Management app, and the "name" value needs to have something indentifiable written in it (like "My KanBo Resource Management")
As for Resource Management's appsettings.json, You can scroll to the bottom of it and find the empty "ClientId" and "ClientSecret" variables. Paste the "OAuth2 config" Client Id and Client Secret inside of their quotation marks
After all the appsettings.json files have been configured and saved, restart both apps, starting with the resource management app first
Connecting the KanBo App to the Resource Management App
Go to the setup page of Your KanBo once again (https://YOURKANBBOURL/setup). You will find a new "Resource Management" tab there

You should be presented with 4 checks passing and one check failing, being the Schema Validation check. If You experience any other results, please check if You pasted everything correctly
Next, click on "Initialize RM content database".
If every check shows as "PASSED", You have now succesfuly connected the KanBo App to the Resource Management App!
Creating Sync Jobs
For KanBo to sync Azure Active Directory profiles and o365 groups two Webjobs need to be created. Along with the web.zip file, You will be provided with a KanBo.JobHost.zip file. It contains its own appsettings.json, which we will need to edit. There are two sections to modify:
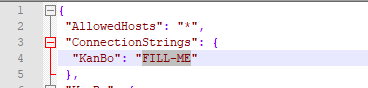
"ConnectionStrings": {
    "KanBo": "FILL-ME"
  },
Here, You will need to paste the same connection string that You use in Your KanBo appsettings.json.
{
    "type": "package",
    "name": "auth-aad",
    "client-id": "FILL-ME",
    "tenant": "FILL-ME",
    "thumbprint": "FILL-ME"
   },
   {
    "type": "package",
    "name": "webjob.group-sync",
    "thumbprint": "FILL-ME",
    "kanbo-url": "FILL-ME"
   }
The values here should be the same ones that You used in the appsettings.json of Your KanBo.After saving the configured file, put all the files into a .zip folder and follow these instructions on creating a scheduled WebJob: https://docs.microsoft.com/en-...
For the o365 Group Sync jobs, choose the name of "GroupSync" and a CRON expression of "0 */15 * * * *"
To create a package for the AAD Profile Sync job, simply replace:
"name": "webjob.group-sync",
with:
"name": "webjob.profile-sync",
and save the config.
Follow the same instructions You did for creating the o365 Group Sync job, but change the name to "ProfileSync".
Use it
- Create boards.
- During the board creation, you can choose whether you would like to create new Office 365 Group or use the existing one under the board.
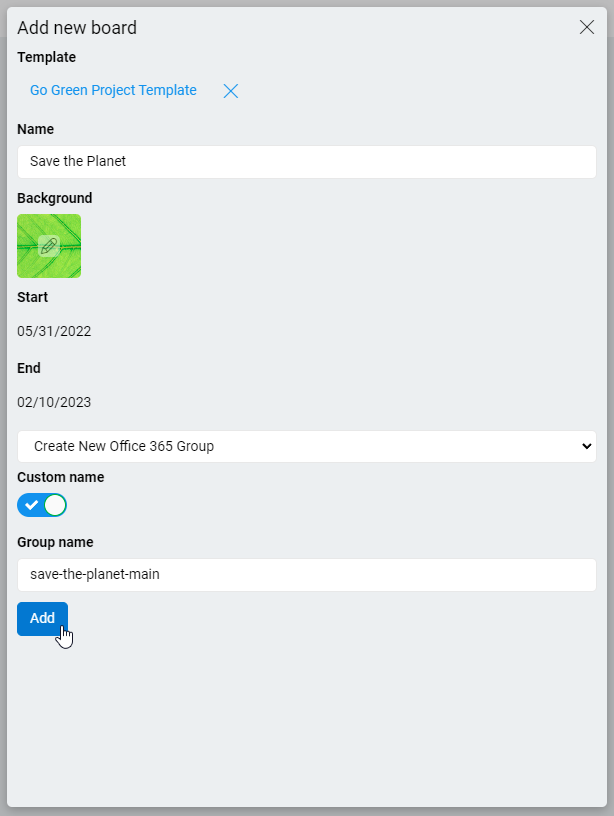
- Group memberships will be synchronized.
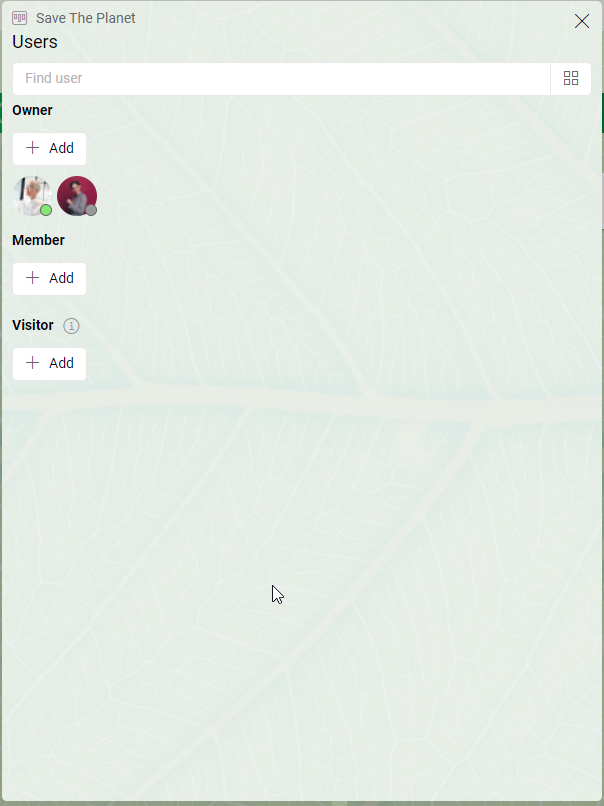
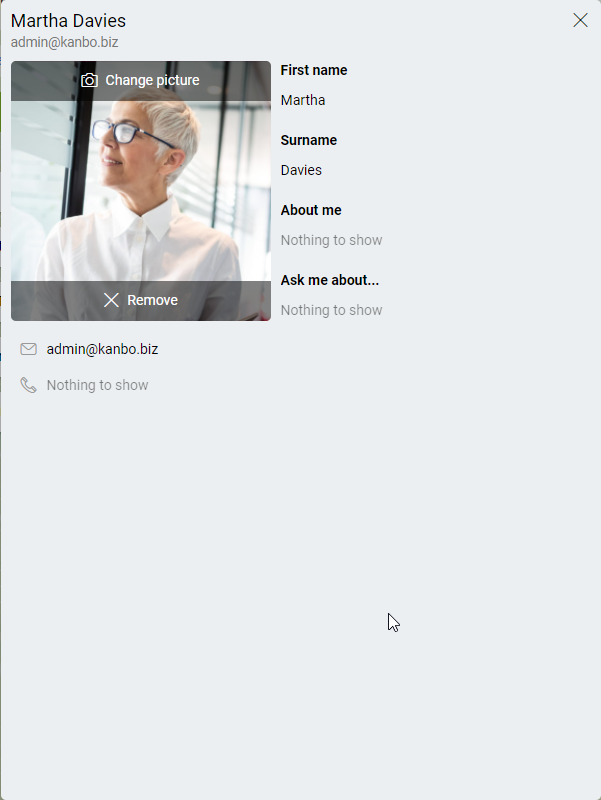
Also, user's information will be taken from AAD and transferred into KanBo Profile.
Configure KanBo
1. Configure email notifications
Follow this instruction to
configure email notifications.
2. Configure KanBo Search
Follow this instruction to
configure Search for KanBo (Elastic Search).
3. Configure KanBo Teams App
Follow this article to configure KanBo Teams App4. Configure KanBo Content Database on Azure
As soon as your KanBo is installed, please adjust the sizing of Your database to be suitable
A change might be
necessary for a good performance of the KanBo Content Database which has been created during the Setup
installation.
You can see dependencies on the table below:
| Number of users on your KanBo instance | Recommended Pricing Tier for KanBo Content Database |
| 20+ users | Standard 10 DTUs 250GB |
| 50+ users | Standard 20 DTUs 250GB |
| 100+ users | Standard 50 DTUs 250GB |