
Replace Expiring Client Secret
Client secrets for KanBo that are registered using the AppRegNew.aspx page expire after one year. This issue appears
only to users of KanBo on Office 365. Contact us anytime when you face this problem at support@kanboapp.com.
This article explains how to add a new secret for the add-in and is based on this Microsoft article.
Prerequisites for refreshing a client secret. Ensure the following before you begin:
- SharePoint Online Management Shell or Powershell
- Make sure you have Tenant Admin rights for Office 365.
Create a Client Secret which is valid for three years
For expired client secrets, first you must delete all of the expired secrets for a given clientId. Then you create a new one with MSO PowerShell, wait at least 24 hours, and test the app with the new clientId and ClientSecret key.Important note going forward. If You encounter issues with getting modules, run this command:
[Net.ServicePointManager]::SecurityProtocol = [Net.SecurityProtocolType]::Tls12
This will change the security protocol for the current session only. Changing the protocol will fix issues with the modules not being downloaded.
1. Start SharePoint Online Management Shell as Administrator
Find-Module msonline*
Confirm with Y if there will be a question regarding NuGet
Output:
Version Name Repository Description
------- ---- ---------- -----------
1.1.183.8 MSOnline PSGallery Microsoft Azure Active Directory Module for Wind...
1.0.51 MSOnlineExt PSGallery This PowerShell module was made to ease the burd...
2.
get-Module msonlineext
Save-Module MSOnlineExt -Path C:\windows\system32\WindowsPowerShell\v1.0\Modules  (it should download MSOnline as well and install both modules)
Get-Module -ListAvailable -Name MSOnline*
Output:
Directory: C:\WINDOWS\system32\WindowsPowerShell\v1.0\Modules
ModuleType Version Name ExportedCommands
---------- ------- ---- ----------------
Manifest 1.1.183.8 MSOnline {Get-MsolDevice, Remove-MsolDevice, Enable-MsolDevice, Dis...
Script 1.0.51 MSOnlineExt {Get-MsolTenantContext, Get-MSOnlineExtTelemetryOption, Re...
If you got here your environment is reday to connect.
3. Steps - Variant if you have the admin tenant rights to your tenant:
import-module MSOnline
$msolcred = get-credential
connect-msolservice -credential $msolcred
Steps - Variant if you have are using a Partner Access to another tenant:
import-module MSOnline
$msolcred = get-credential
connect-msolservice -credential $msolcred
$MSOLTenantid = (get-msolpartnercontract -domain <name of tenant>.onmicrosoft.com).tenantid.guid
connect-msolservice -credential $msolcred
4. Steps are similar for both variants from here:
$clientId = "<your client id from web.config>"
$keys = Get-MsolServicePrincipalCredential -AppPrincipalId $clientId  (press Enter)
Write-Output $keys
Output:
Type : Password
Value :
KeyId : a6c1cdfa-4074-4605-96ec-3d28af31b934
StartDate : 3/10/2017 6:35:01 PM
EndDate : 3/10/2018 6:35:01 PM
Usage : Verify
Type : Symmetric
Value :
KeyId : c8403b31-59bd-457d-8d83-555fd8389e47
StartDate : 3/10/2017 6:35:01 PM
EndDate : 3/10/2018 6:35:01 PM
Usage : Verify
Type : Symmetric
Value :
KeyId : cb476cdc-7fb6-4dae-a2a6-3332e4635421
StartDate : 3/10/2017 6:35:01 PM
EndDate : 3/10/2018 6:35:01 PM
Usage : Sign
5. Use the three KeyIds to construct this script and run this:
Remove-MsolServicePrincipalCredential -KeyIds @("a6c1cdfa-4074-4605-96ec-3d28af31b934","c8403b31-59bd-457d-8d83-555fd8389e47","cb476cdc-7fb6-4dae-a2a6-3332e4635421") -AppPrincipalId $clientId
6. Then have a check:
$keys = Get-MsolServicePrincipalCredential -AppPrincipalId $clientId
Write-Output $keys
7. Is it empty? No keys? - that is very good because now you can continue, otherwise check the IDs again.
$bytes = New-Object Byte[] 32
$rand = [System.Security.Cryptography.RandomNumberGenerator]::Create()
$rand.GetBytes($bytes)
$rand.Dispose()
$newClientSecret = [System.Convert]::ToBase64String($bytes)
$dtStart = [System.DateTime]::Now
$dtEnd = $dtStart.AddYears(3)
New-MsolServicePrincipalCredential -AppPrincipalId $clientId -Type Symmetric -Usage Sign -Value $newClientSecret -StartDate $dtStart  -EndDate $dtEnd
New-MsolServicePrincipalCredential -AppPrincipalId $clientId -Type Symmetric -Usage Verify -Value $newClientSecret   -StartDate $dtStart  -EndDate $dtEnd
New-MsolServicePrincipalCredential -AppPrincipalId $clientId -Type Password -Usage Verify -Value $newClientSecret   -StartDate $dtStart  -EndDate $dtEnd
$newClientSecret
8. Replace the old secret in your web.config with the new one from the Powershell window, it should be something like this:
wUSGT/X8jQVyB3q+1VNBy8K1ButT1S6A5B2kWdK69uc=
10. Now recheck again the dates. Press enter after inserting the first command.
$keys = Get-MsolServicePrincipalCredential -AppPrincipalId $clientId
Write-Output $keys
The 3 keys should have a validity from today until today+3 years
11. It can take up to 12h until Office 365 will respect the new secret
Update the KanBo web.config
In case your KanBo is hosted on a KanBo Azure website (provided by KanBo company) please send your new client secret to support@kanboapp.com
If your KanBo is hosted on your Azure please add following line to the web.config:
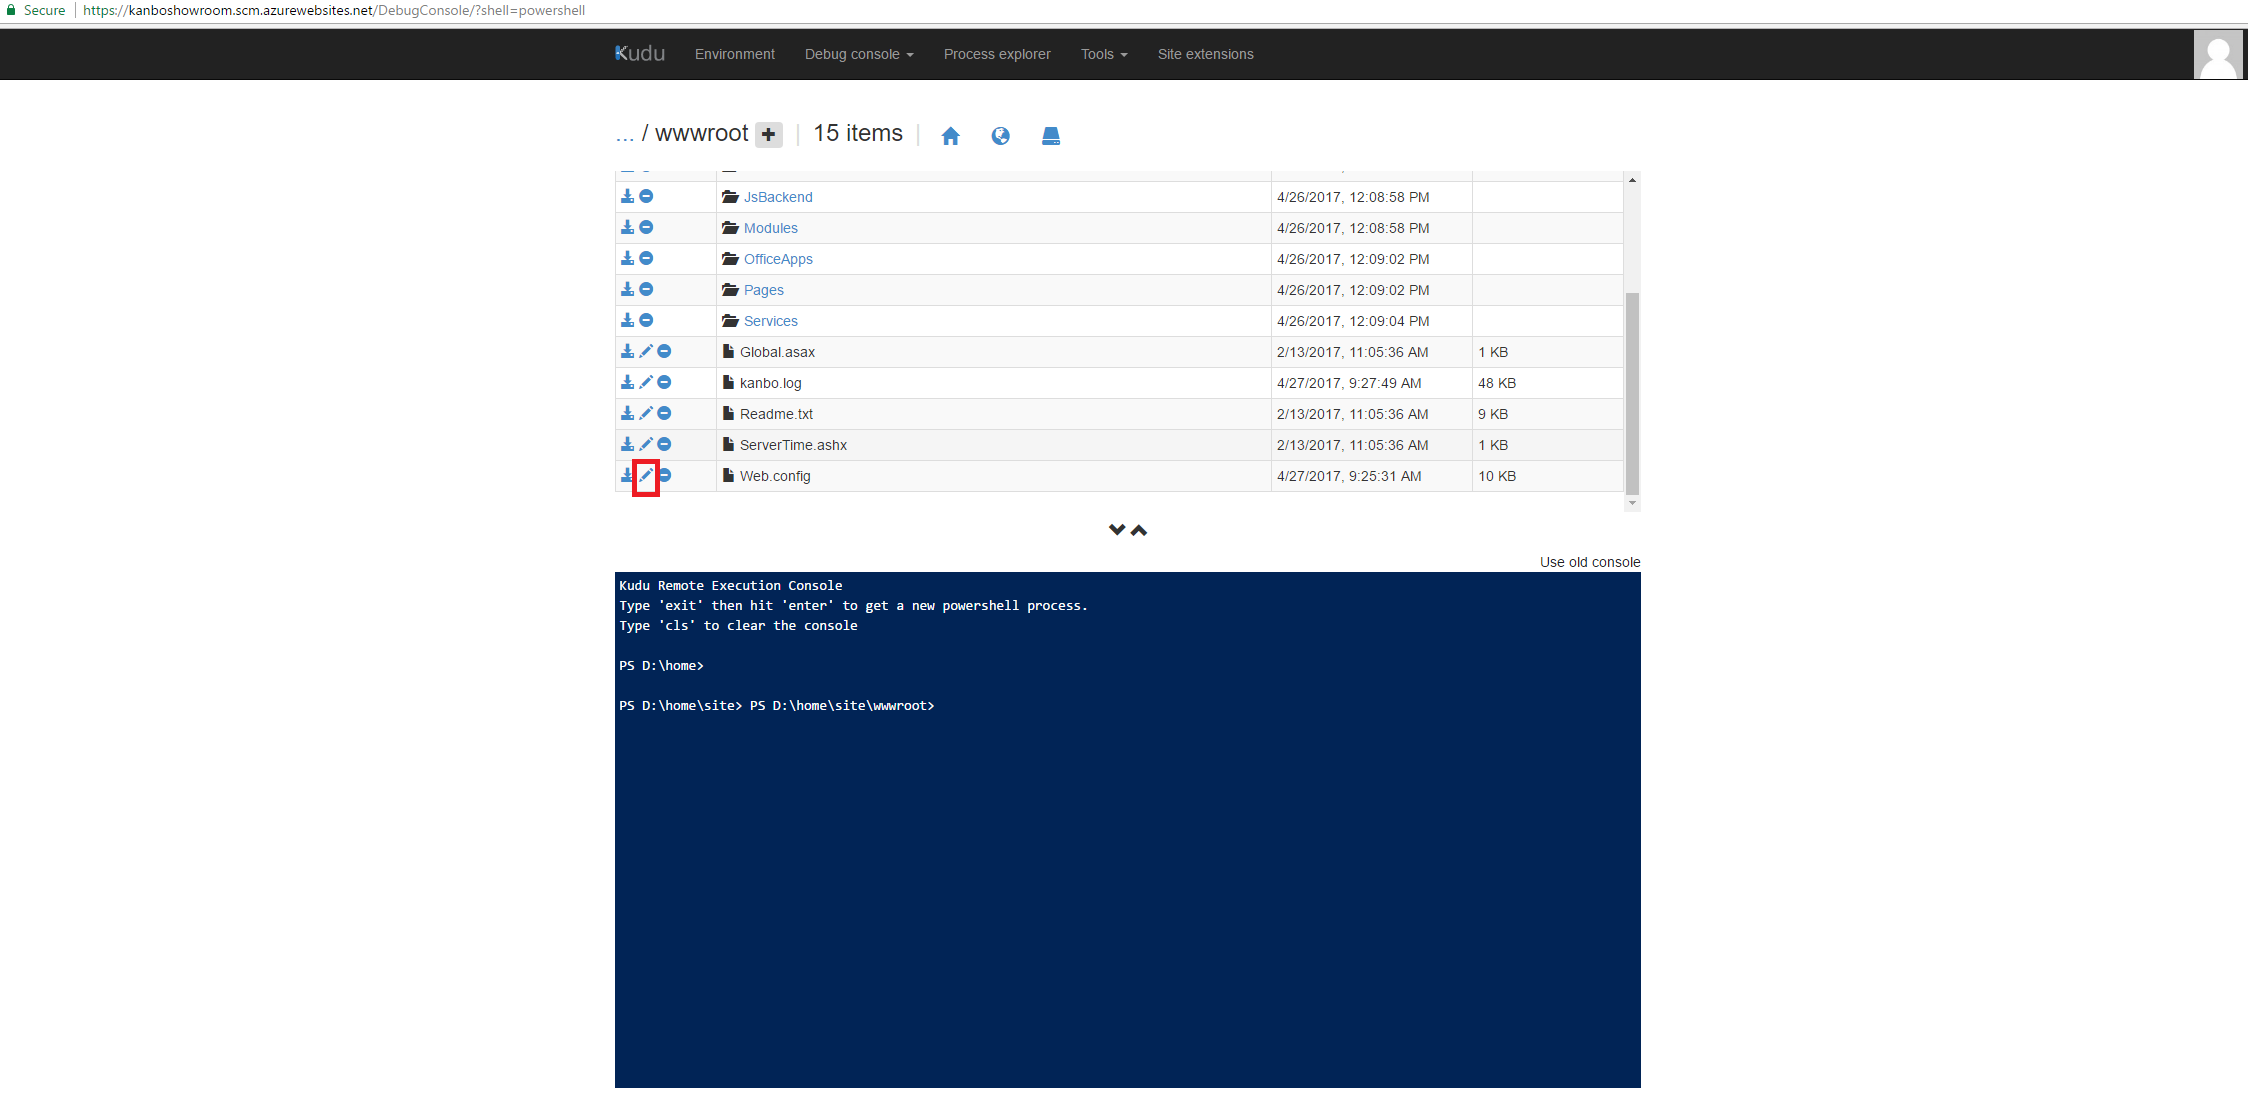
1. Go to Kudu services (simply enter address https://YOURWEBAPP.scm.azurewebsites.net)
2. Then enter Debug console -> Powershell. In this section please go to site -> wwwroot folder and open the web config in the window of your browser.
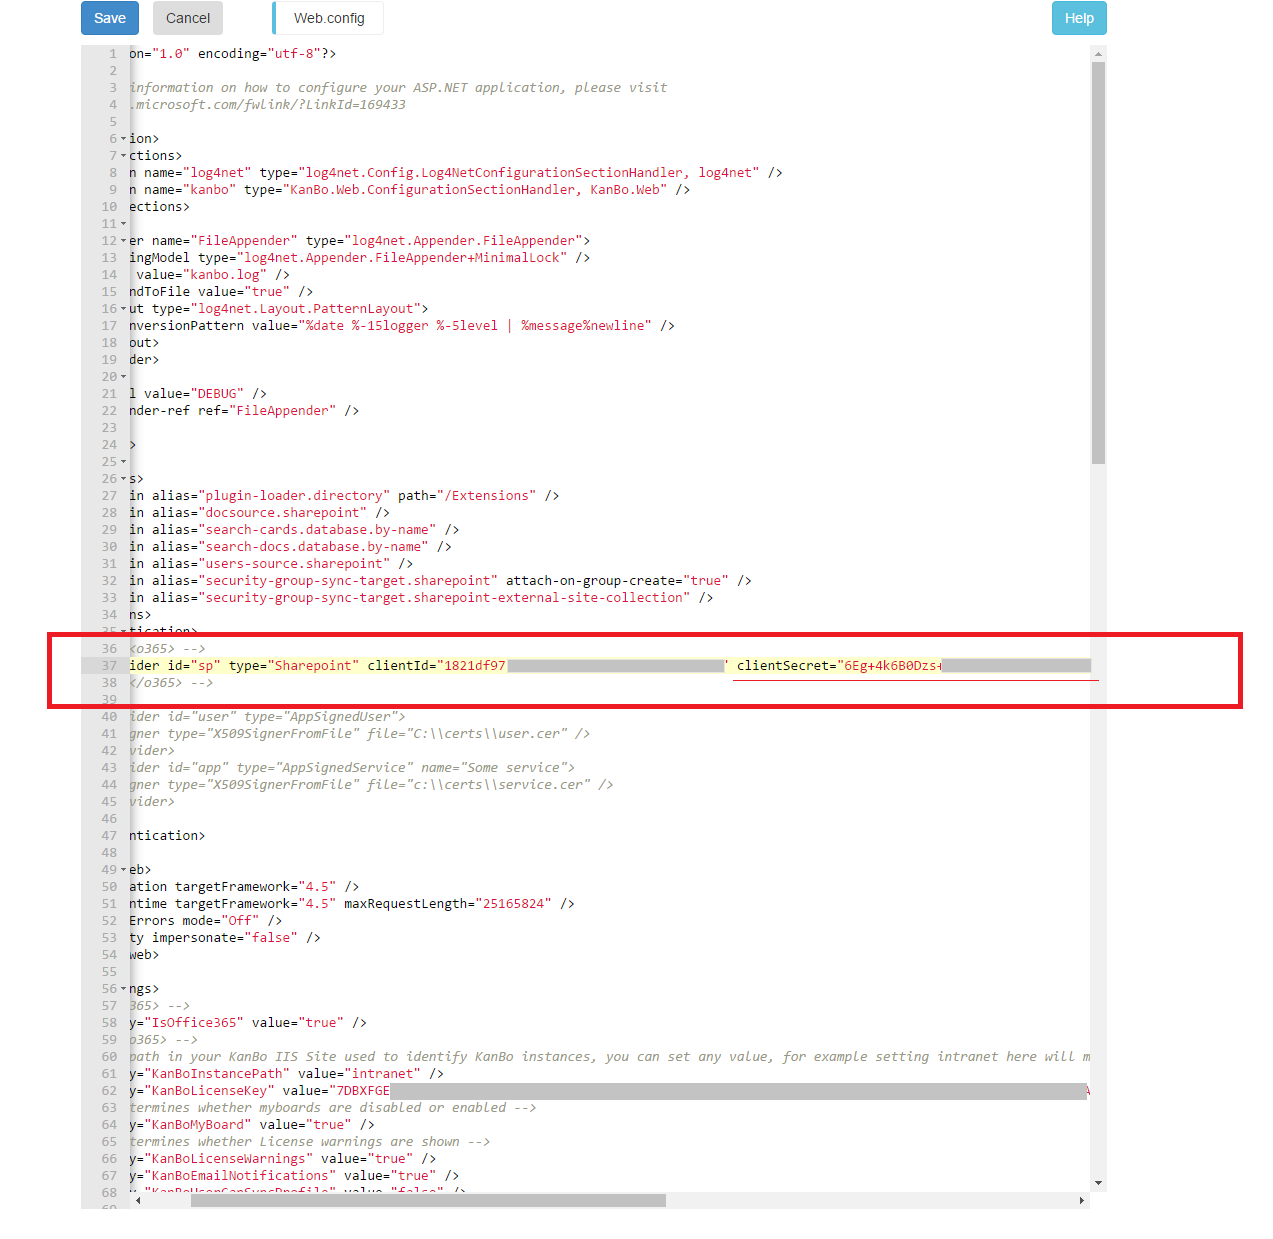
3. In web.config, please find the following line and remove the old client secret. When removed, please paste there a new one.
 <!-- <o365> -->
<provider id="sp" type="Sharepoint" clientId="1821df97-068d-49ef-XXXX-XXXX-XXXX" clientSecret="NEWCLIENTSECRET" />
 <!-- </o365> -->
4. Save these changes by clicking on Save button.
5. Restart the web application. It can take up to 24 hours until new Client secret is deployed and KanBo starts working properly again.