
-
Learn the Basics
-
- Spaces
- Space Types
- Creating Spaces
- Adding Users to Spaces
- Space Activity Stream
- Following Spaces
- Space Details
- General Space Settings
- Duplicating Spaces
- Renaming Spaces
- Changing the Space Color and Icon
- Removing Users from Spaces
- Closing and Restoring Spaces
- Moving Spaces between Different KanBo Environments
- Deleting Spaces
-
- Creating Cards
- Following Cards
- Scheduling Cards
- Renaming Cards
- Duplicating Cards
- Quick Actions
- Mass Actions
- Copy & Paste
- Archiving Cards
- Adding Cards to MySpace
- Adding Mirror Cards
- Removing Mirror Cards
- Moving Cards between Spaces
- Deleting Cards
- Removing Cards from MySpace
- Hinzufügen von Karten zu "MySpace"
- Entfernen von Karten aus "MySpace"
- Hinzufügen von Status
-
Visualize Work
-
- Space Views
- Creating Space Views
- Personal and Shared Space Views
- Card Grouping
- Filtering Cards
- Display Settings
- Work Progress Calculation
- Grouping Description
- Card Grouping Settings
- Changing the Order of Groupings
- Changing the Order of Space Views
- Deleting Space Views
- Following Card Statuses and Custom Fields
-
-
Collaborate
-
Level Up Your Work
-
Work Securely
-
Integrations
-
- Advanced KanBo Actions in Power Automate
- Creating KanBo Space Attached to Subfolder Created by Power Automate
- Creating Document Folders in Document Libraries Created by KanBo with Power Automate
- Exporting Space Views to Excel
- KanBo and Azure Logic Apps Integration
- Power Automate Integration: Triggers and Actions
- Seamless Import from Microsoft Planner to KanBo
- Synchronizing KanBo with Outlook Calendar
- Using KanBo Outlook App
-
Sending Comments as Email Messages
This post is also available in: Deutsch
In this article:
Overview
This function must be enabled as an additional component. See how to configure this functionality.
This feature allows you to write a comment on a card and mark it for sending to an email recipient. In combination with a card’s public email address, you can communicate with external users, as they will reply directly to the card.
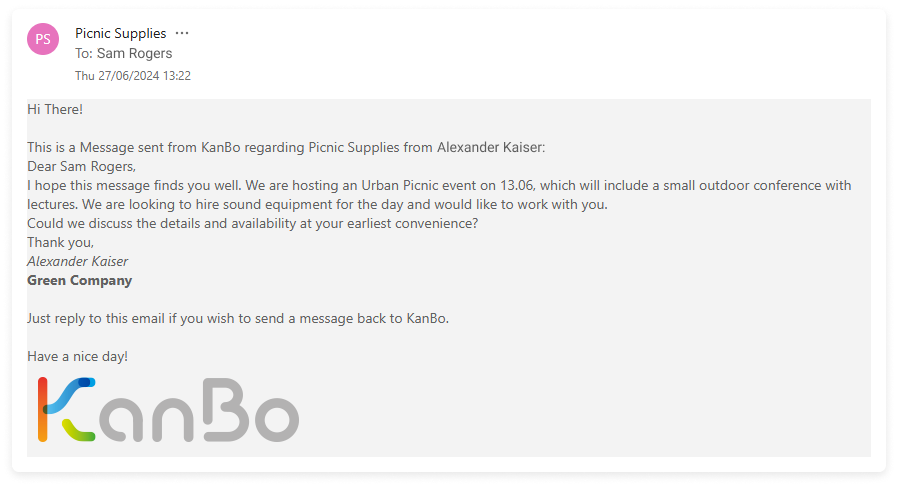
A copy of the sent message will remain in the card as a comment, with information about the addressee underneath.
It is worth creating an email address for the card to allow you to receive a return message in the form of a new comment. See how to enable the Incoming Emails feature.
Send comments as emails
To send the card comment as an email message:
- Open the space.
- Enter the card.
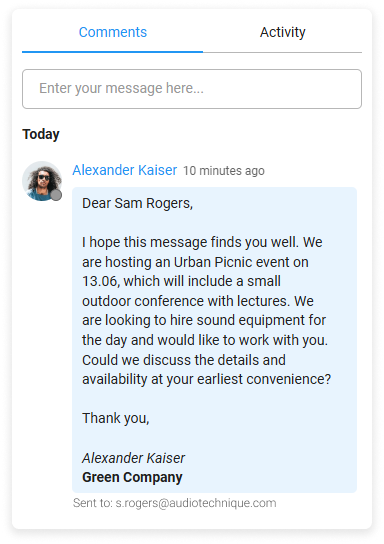
- On the Comments section, in the text field, enter the message.
- On the Send button, go to the drop-down menu, and then select Send as email.

If your card does not have an email address, you may now create one.
- You will be asked to create an incoming email address. This will allow users to reply to this email. The next steps are optional.
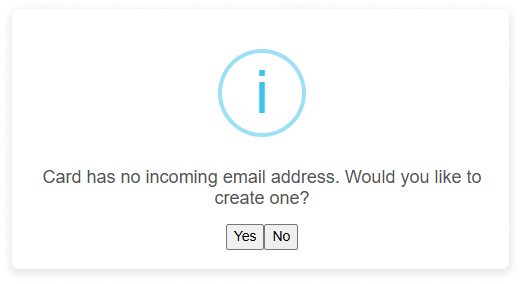
- On the pop-up window, select Yes.
- Select whether to create a custom or generated email address for the card, and then select Add.
- Select one or more emails to which your message will be sent, and then select Send.
The comment will be visible in the activity stream, along with information about who the message was sent to.
Was this article helpful?
Please, contact us if you have any additional questions.