
-
Learn the Basics
-
- Spaces
- Space Types
- Creating Spaces
- Adding Users to Spaces
- Space Activity Stream
- Following Spaces
- Space Details
- General Space Settings
- Duplicating Spaces
- Renaming Spaces
- Changing the Space Color and Icon
- Removing Users from Spaces
- Closing and Restoring Spaces
- Moving Spaces between Different KanBo Environments
- Deleting Spaces
-
- Creating Cards
- Following Cards
- Scheduling Cards
- Renaming Cards
- Duplicating Cards
- Quick Actions
- Mass Actions
- Copy & Paste
- Archiving Cards
- Unarchiving Cards
- Adding Cards to MySpace
- Adding Mirror Cards
- Removing Mirror Cards
- Moving Cards between Spaces
- Deleting Cards
- Hinzufügen von Karten zu "MySpace"
- Removing Cards from MySpace
- Entfernen von Karten aus "MySpace"
- Hinzufügen von Status
- Creating Card Blockers
- Managing Card Blockers
-
- Documents in KanBo
- Card Documents
- Uploading or Creating Documents in Cards
- Attaching and Detaching Documents in Cards
- Space Documents
- Document References
- Document Sources
- Downloading Documents
- Editing Documents
- Editing Documents in Browser
- Editing Documents in Office Applications
- Renaming Documents
- Deleting Documents
-
Visualize Work
-
- Space Views
- Creating Space Views
- Personal and Shared Space Views
- Card Grouping
- Filtering Cards
- Display Settings
- Work Progress Calculation
- Grouping Description
- Card Grouping Settings
- Changing the Order of Groupings
- Changing the Order of Space Views
- Deleting Space Views
- Following Card Statuses and Custom Fields
-
-
Collaborate
-
Level Up Your Work
-
Work Securely
-
Integrations
-
- Advanced KanBo Actions in Power Automate
- Creating KanBo Space Attached to Subfolder Created by Power Automate
- Creating Document Folders in Document Libraries Created by KanBo with Power Automate
- Exporting Space Views to Excel
- KanBo and Azure Logic Apps Integration
- Power Automate Integration: Triggers and Actions
- Seamless Import from Microsoft Planner to KanBo
- Synchronizing KanBo with Outlook Calendar
- Using KanBo Outlook App
-
Custom Fields
This post is also available in: Deutsch
New card design coming soon with the KanBo 3.0 version!
Custom fields are a powerful feature in KanBo that allow you to tailor your space to fit your workflow. With custom fields, you can capture specific information, track important details, and organize your work in a way that makes sense for your team.
There are two types of custom fields:
What is the difference between them?
-
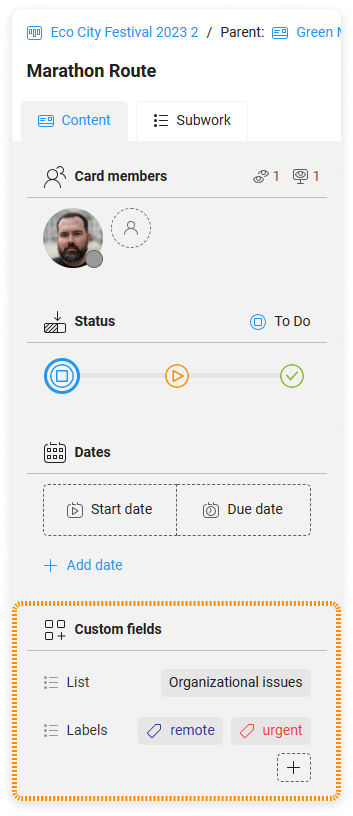
Information about custom fields is presented at the bottom left corner of the card content.
-
Lists are a way to organize and group your cards into different categories or stages. Each card can be assigned to only one list, making it an efficient way to create separate groups of cards.
-
Labels are a way to categorize and classify your cards. They act as tags that can be assigned to cards to provide additional information or context. You can add multiple labels to a single card and set different colors for each label to make them easily recognizable.
Custom field section is a part of the card content.
You can present your custom fields in space using:
In the example below, we see cards grouped by lists. Labels are displayed on the card fronts in the form of card details.

In conclusion, custom fields in KanBo, such as labels and lists, provide customization to your spaces and cards. With custom fields, you can tailor KanBo to suit your specific needs and workflows, enhancing collaboration and productivity for your team.
See how to:
FAQ
Can card be assigned to more than one label?
Yes, a card can be assigned to more than one label, but it can only be assigned to one list.
Who can create list and labels?
Only space owners can create list and labels.
Was this article helpful?
Please, contact us if you have any additional questions.