
-
Learn the Basics
-
- Creating Cards
- Changing Card Statuses
- Following Cards
- Scheduling Cards
- Renaming Cards
- Duplicating Cards
- Quick Actions
- Mass Actions
- Copy & Paste
- Creating Card Statuses
- Changing the Default Card Status
- Changing the Order of Card Statuses
- Deleting Card Statuses
- Moving Cards between Spaces
- Archiving Cards
- Unarchiving Cards
- Deleting Cards
- Creating Card Blockers
- Managing Card Blockers
- Adding Cards to MySpace
- Hinzufügen von Karten zu "MySpace"
- Removing Cards from MySpace
- Entfernen von Karten aus "MySpace"
- Adding Mirror Cards
- Removing Mirror Cards
-
- Documents in KanBo
- Card Documents
- Uploading or Creating Documents in Cards
- Attaching and Detaching Documents in Cards
- Space Documents
- Document References
- Document Sources
- Downloading Documents
- Editing Documents
- Editing Documents in Browser
- Editing Documents in Office Applications
- Renaming Documents
- Deleting Documents
-
Visualize Work
-
- Space Views
- Creating Space Views
- Personal and Shared Space Views
- Card Grouping
- Filtering Cards
- Display Settings
- Work Progress Calculation
- Grouping Description
- Card Grouping Settings
- Changing the Order of Groupings
- Changing the Order of Space Views
- Deleting Space Views
- Following Card Statuses and Custom Fields
-
-
Collaborate
-
Level Up Your Work
-
Work Securely
-
Integrations
-
- Advanced KanBo Actions in Power Automate
- Creating KanBo Space Attached to Subfolder Created by Power Automate
- Creating Document Folders in Document Libraries Created by KanBo with Power Automate
- Exporting Space Views to Excel
- KanBo and Azure Logic Apps Integration
- Power Automate Integration: Triggers and Actions
- Seamless Import from Microsoft Planner to KanBo
- Synchronizing KanBo with Outlook Calendar
- Using KanBo Outlook App
-
Sending Emails to KanBo Card or Space
This post is also available in: Deutsch
Space is the new name for the board.
Coming soon with the KanBo 3.0 version!
The incoming email feature allows you to send emails to a space or directly to a card. This email will become a new card or its contents will be added to an existing card.
Incoming emails in spaces
Create a new card by sending an email to the space.
1. Create a space email adress
- Open the space.
- Go to the space menu by clicking More (three-dot menu button).

- Select
 Settings.
 - Choose
 Incoming emails.
 - Click Add.
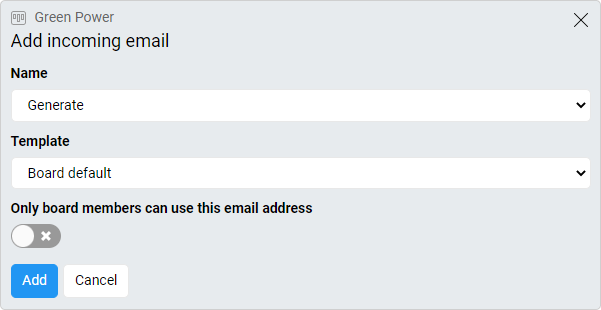
- Enter a custom name or let it be generated automatically.
- Choose a card template (default or your own).
The selection of the card template will affect the structure of the card that will be created through the incoming email. This can affect, for example, the initial card status, assigned lists and labels.
If you have more card templates, you can create several email addresses within a single space.
- Click on Add.
2. Send an email to the space
Copy the space email address to the clipboard and send an email.
- Open the space.
- Go to the space menu by clicking More (three-dot menu button).
- Select Get email address.
The space email address will be copied to the clipboard.
After sending the email, you should wait for 5 minutes (or another time that is set for the incoming email by your administrator).
Add extra information in the subject using "#" and "@". With #labelname, you can create a label for the new card. Use @mentions to assign users to the card. It works with the @Name Surname and @Surname of the user.
Incoming emails in cards
Add some card content by sending an email to the card.
1. Create a card email adress
Add content to cards by sending emails to them.
- Open the space.
- Open the card.
- Click the three-dot menu button.
- Select Get email address.
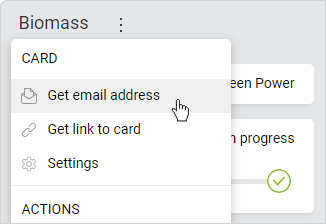
- Enter a custom name or let it be generated automatically.
- Click on Add.
The card email address was created.
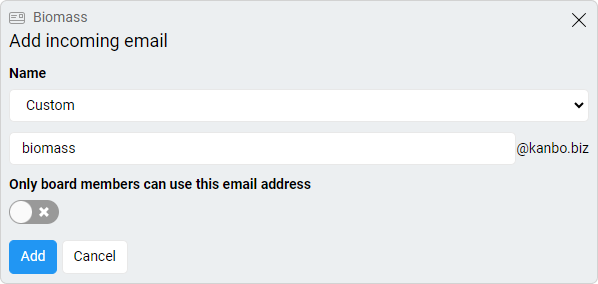
2. Send an email to the card
Copy the space email address to the clipboard and send an email.
- Open the space.
- Open the card.
- Click the three-dot menu button.
- Select Get email address.
The card email address will be copied to the clipboard. The message sent to this email address will become the content of the card.
Tips & tricks
- Incoming emails won’t work when there is no grouping in a space.
- If any of your email addresses are under a spam attack, please change your public/private address to a new one and inform all people that should know the new address. Optionally you can set up some additional spam filter rules on your Exchange/Office 365. You could also add a rule to delete all emails that are older than 48 hours to keep the KanBo incoming mailbox clean.
If you would like to install the incoming emails functionality, please read the installation manual here. Contact us at support@kanboapp.com with any questions.
FAQ
Can user add a card directly from an email?
Yes, you can send an email directly to the space which will result in creating a new card.
Can I create labels and assign users to a card created by email?
Yes, you can use #labelname to create a label and @Name to assign users to the card in your email message to the space.
Can I set up incoming emails functionality myself or do I need an administrator to do it for me?
You need an administrator to install the Incoming Emails functionality. Once it’s installed, you can set up your incoming email addresses.
Was this article helpful?
Please, contact us if you have any additional questions.