
-
Learn the Basics
-
- Creating Cards
- Changing Card Statuses
- Following Cards
- Scheduling Cards
- Renaming Cards
- Duplicating Cards
- Quick Actions
- Mass Actions
- Copy & Paste
- Creating Card Statuses
- Changing the Default Card Status
- Changing the Order of Card Statuses
- Deleting Card Statuses
- Moving Cards between Spaces
- Archiving Cards
- Unarchiving Cards
- Deleting Cards
- Creating Card Blockers
- Managing Card Blockers
- Adding Cards to MySpace
- Hinzufügen von Karten zu "MySpace"
- Removing Cards from MySpace
- Entfernen von Karten aus "MySpace"
- Adding Mirror Cards
- Removing Mirror Cards
-
- Documents in KanBo
- Card Documents
- Uploading or Creating Documents in Cards
- Attaching and Detaching Documents in Cards
- Space Documents
- Document References
- Document Sources
- Downloading Documents
- Editing Documents
- Editing Documents in Browser
- Editing Documents in Office Applications
- Renaming Documents
- Deleting Documents
-
Visualize Work
-
- Space Views
- Creating Space Views
- Personal and Shared Space Views
- Card Grouping
- Filtering Cards
- Display Settings
- Work Progress Calculation
- Grouping Description
- Card Grouping Settings
- Changing the Order of Groupings
- Changing the Order of Space Views
- Deleting Space Views
- Following Card Statuses and Custom Fields
-
-
Collaborate
-
Level Up Your Work
-
Work Securely
-
Integrations
-
- Advanced KanBo Actions in Power Automate
- Creating KanBo Space Attached to Subfolder Created by Power Automate
- Creating Document Folders in Document Libraries Created by KanBo with Power Automate
- Exporting Space Views to Excel
- KanBo and Azure Logic Apps Integration
- Power Automate Integration: Triggers and Actions
- Seamless Import from Microsoft Planner to KanBo
- Synchronizing KanBo with Outlook Calendar
- Using KanBo Outlook App
-
Card Icons
This post is also available in: Deutsch
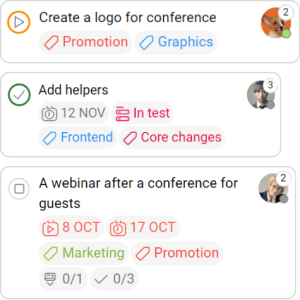
If you look at the space, you will see that each card has various icons. They represent the contents of the card. Icons are helpful in categorizing tasks and observing the progress of work. Colors give them additional power.
Legend
Learn about the meanings of the icons:
 start date – the date set for the start of the card
- due date – the date set for the end of the card
- creation date – the date of card creation
- completed date – date of changing the card status to Completed
- age – number of days since card creation
- list – all card lists the card belongs to
- label- all labels assigned to the card
- children – number of subcards (completed/all)
- default parent – the name of the default parent card
- – number of subitems from to-do list (completed/all)
Card status icons
The card status icon symbolizes the state the card is in at the current moment.
")
The bold line ![]() shows the work progress.
shows the work progress.
There are 4 available card status roles to choose from. Each of them has a different icon:
- Not started
- In progress
- Completed
- Information
Card members
![]() The number of Co-Workers and avatar of the Responsible Person
The number of Co-Workers and avatar of the Responsible Person
Examples
![]() Card relations (this card has 1 child)
Card relations (this card has 1 child)
FAQ
What are cards in KanBo?
Cards are the most fundamental units of KanBo. They can represent tasks or projects that need to be tracked and managed. Its complex structure helps with work organization.
Can I customize the information displayed on the card front?
Yes, you can manage the presence of the map details in the display settings and decide what kind of information you want to see on the card front.
Was this article helpful?
Please, contact us if you have any additional questions.